Key Takeaways
- Plastic pipe leaks trace back to age, thermal stress, improper installation, or joint failure — and the right fix depends on the pipe material
- Repair methods include silicone tape, epoxy putty, fiberglass wrap, pipe clamps, slip couplings, and specialized bonding systems
- HDPE and large-diameter industrial plastic pipes require molecular bonding systems — standard adhesives and tapes won't work
- Choosing repair over replacement at the right moment cuts operational downtime and avoids unnecessary pipe replacement costs
Why Plastic Pipes Leak: Common Causes and Warning Signs
Plastic pipe failure causes. The pipe material influences which cause is most likely:
| Pipe Material | Primary Failure Cause | Contributing Factors |
|---|---|---|
| PVC / CPVC | Solvent-weld joint failure | Dry joints, cure-period movement, cyclic fatigue at directional fittings |
| PEX | Oxidative degradation | Chlorine exposure in hot water; tested per ASTM F2023 |
| HDPE / PE | Slow crack growth (SCG) | Localized stress intensification; gradual long-term degradation |
Common Leak Warning Signs
Catching a leak early cuts the risk of structural damage, mold growth, and costly downtime. Watch for:
- Visible moisture or water stains near pipes or walls
- Sudden drop in water pressure
- Mold growth or musty odor in enclosed areas
- Pooling water around buried or underground pipe runs
Any of these signs warrants immediate investigation. Never assume a small weep or drip will self-seal — Water waste from leaks, and industrial systems scale that figure significantly higher.
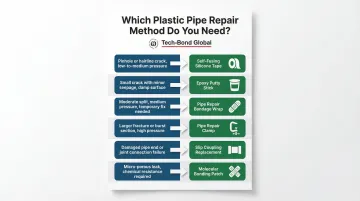
Plastic Pipe Leak Repair Methods: Which One Should You Use?
No single repair method works for every plastic pipe scenario. The correct choice depends on leak type (pinhole, crack, joint, or circumferential), pipe material, system pressure, and whether a temporary or permanent fix is needed. Here's the decision framework:
Decision Framework:
- Pinhole or hairline crack, low-to-medium pressure: Self-fusing tape
- Crack or joint leak, must be dry, moderate pressure: Epoxy putty
- Longer crack, need durable patch, hard-to-access location: Fiberglass wrap
- Mid-pipe leak, need mechanical compression: Pipe clamp
- Large damaged section, need permanent fix: Slip coupling or section replacement
- HDPE or large-diameter industrial plastic pipe: Molecular bonding patch system
Method 1 — Self-Fusing Silicone or Rubber Repair Tape
Self-fusing tape bonds to itself (not the pipe) to form a compression seal. It's best suited for small pinhole leaks or hairline cracks in low-to-medium pressure lines. Rescue Tape resists pressure up to 8 Bar (approximately 116 psi) and has a minimum tensile strength of 950 PSI.
Key advantages:
- Can be applied to live (flowing) lines in emergency situations
- Works even if the surface is wet, dirty, or oily
- Seals immediately at room temperature
Critical limitation: This is a temporary measure only. It's not suitable for joint leaks, structural damage, or high-pressure systems. Rescue Tape limitations.
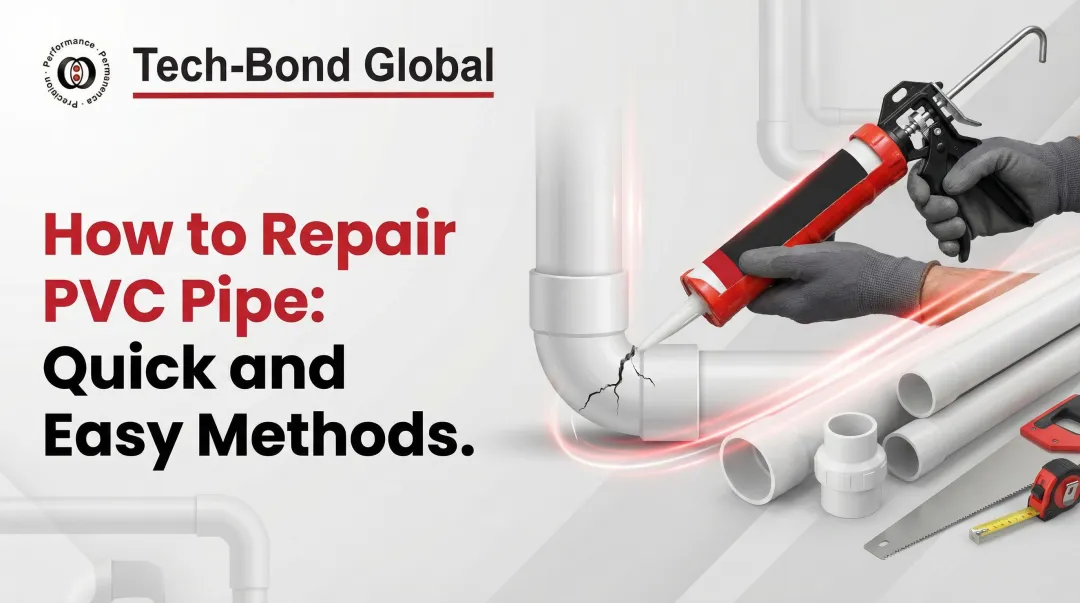
Method 2 — Epoxy Repair Putty
Two-part epoxy putty is ideal for sealing cracks, holes, and joint leaks in PVC and CPVC pipe. The mix-and-apply process is straightforward: knead the putty until you achieve a uniform color, then press firmly over the damaged area.
| Product | Pressure Rating | Working Time | Initial Set | Full Cure |
|---|---|---|---|---|
| RectorSeal EP-200/EP-400 | 1,300 psi | - | 5-10 min | 15-20 min (machineable in 1 hr) |
| J-B Weld WaterWeld | - | - | 15-25 min | 1 hour |
| Loctite 3463 | - | 2.5-5 min | ~10 min | 10 min |
Critical requirement: The pipe must be as dry as possible for proper adhesion. J-B Weld compatibility guide.
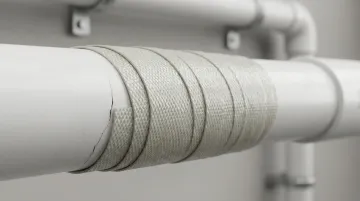
Method 3 — Fiberglass Repair Wrap or Bandage
Water-activated fiberglass wrap is applied over epoxy putty or directly over tape to create a rigid, load-bearing shell around the damaged area. This is the most durable of the tape-and-wrap category of repairs.
| Product | Activation | Installation Time | Cure Time | Standards |
|---|---|---|---|---|
| PermaWrap | Water | 30 min | 2 hours | ASME PCC-2, ISO TS-24817 |
| Clock Spring Contour | Water | - | - | ASME PCC-2, ISO TS-24817 |
| Rapp-it | Water | - | 30 min (minimum) | - |
This method provides a longer-lasting repair compared to tape alone and is appropriate for pipes in hard-to-access areas where replacement is impractical.
Method 4 — Pipe Repair Clamp
A metal clamp with a rubber gasket and bolt assembly creates a mechanical compression seal over a leak along the pipe body. Clamps are available in various diameters to fit different pipe sizes.
| Clamp Model | 1/2"-4" | 2"-8" | 10"-12" | 14"-36" / 18"-24" |
|---|---|---|---|---|
| Mueller 500/510 Series | - | 300 psig | 200 psig | 150 psig |
| Mueller 200 Pipe-Saver | 350 psig | 200 psig (6"-8") | - | 60 psig |
Critical notes: This is best for mid-pipe leaks (not joints) and is another temporary solution meant to hold until a plumber arrives for a permanent fix. Warn against overtightening, which can crack the pipe further.
Method 5 — Slip Coupling or Section Replacement
Cutting out the damaged pipe section and installing a push-to-connect or solvent-welded slip coupling is the most reliable permanent solution for residential plastic pipes (PVC, CPVC, PEX). This method requires water to be fully shut off and the pipe to be drained.
For PVC/CPVC: Follow the primer-and-cement process per ASTM D2564 (PVC) and ASTM F493 (CPVC) standards. Solvent weld cure times.
For PEX: Use crimp ring connections per ASTM F1807 (copper crimp rings) or ASTM F2098 (stainless steel clamps).
This is the go-to solution when the damaged area is too large for a patch. Comprehensive studies of water main break rates found that PVC pipe has the lowest overall failure rate among common distribution pipe materials.
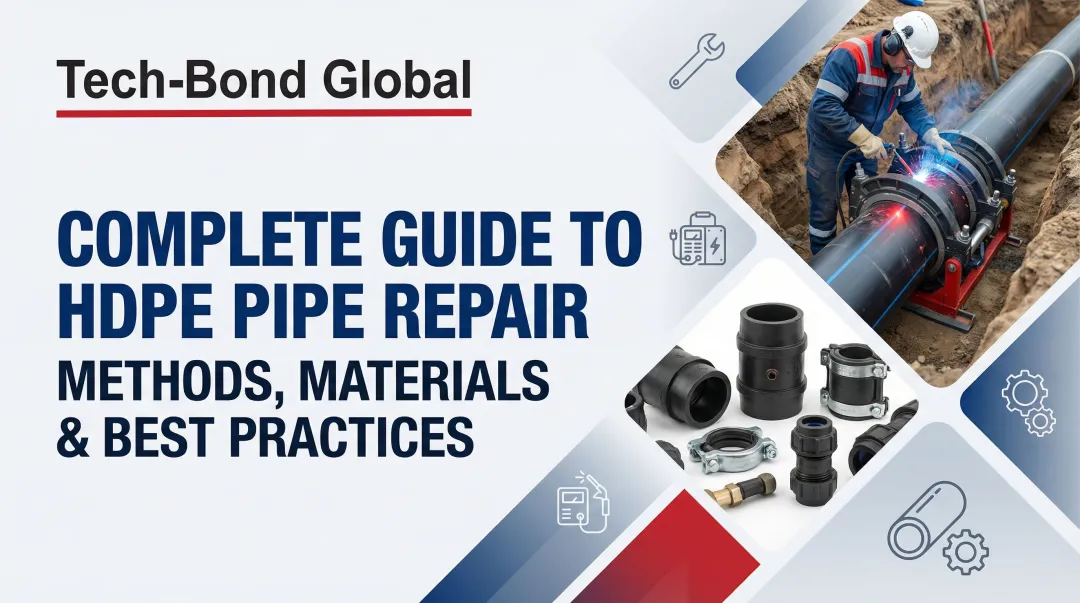
Method 6 — Molecular Bonding Patch Systems (for HDPE and Industrial Plastic Pipe)
Standard tapes, putties, and adhesives cannot bond to HDPE (high-density polyethylene) because of its low surface energy. HDPE has a surface tension of just 31.6 dynes/cm (mJ/m²), which prevents conventional adhesives from properly wetting the surface — they wrap around the pipe but peel away under pressure.
Industry guidelines explicitly state that polyethylene piping products cannot be joined with adhesives or solvent cement; heat fusion is required. Heat fusion, however, requires specialized equipment and controlled conditions that make it impractical for field repairs on installed pipe.
Tech-Bond Global's Tech Patch Repair System (TPRS) addresses this gap directly. It uses PTFE-coated E-glass fabric and a patented Polymer Bonding Process that crosslinks with the pipe surface at the molecular level, rather than relying on adhesive chemistry.
The system has been validated by IIT (ISM) Dhanbad and proven in a real-world repair of a 78-inch HDPE pipe for Borouge in Abu Dhabi. Independent third-party testing showed TPRS-repaired HDPE pipe withstood 1,800 psi at 20°C, more than five times the pipe's original rated pressure of approximately 350 psi.
TPRS performance at a glance:
- Validated on 78-inch HDPE pipe in field conditions (Borouge, Abu Dhabi)
- Withstands 1,800 psi — over 5× the original pipe pressure rating
- Pipe wall failed before the bonded repair layer in all tests
- Works on HDPE, PTFE, polypropylene, and other low-surface-energy plastics where conventional adhesives fail

How to Fix a Plastic Pipe Leak: Step-by-Step
The repair method matters less than the sequence you follow. Skipping surface prep or cutting cure time short are the two most common reasons pipe repairs fail ahead of schedule.
Step 1: Shut Off Water and Assess the Damage
Turn off the water supply to the affected line (or the main supply if no local shutoff exists). Drain the line fully before beginning. Document the location, size, and type of leak: pinhole, crack, joint separation, or circumferential fracture. Confirm the pipe material before selecting a repair product — products designed for one material may fail on another.
Step 2: Clean and Prepare the Pipe Surface
Remove all dirt, grease, moisture, and pipe scale from the repair area using a clean cloth. Where needed, use light sandpaper to roughen the surface and improve adhesion. Some repair products (silicone tape) can be applied to wet surfaces, while others (epoxy putty) require the area to be as dry as possible. Always follow the specific product's surface preparation instructions.
Step 3: Apply the Chosen Repair Method
Apply the selected repair material firmly and correctly:
- For tape: Stretch and overlap tightly, wrapping at least one pipe diameter beyond the damage on each side
- For epoxy putty: Knead thoroughly until uniform color, press firmly into the crack or joint without voids
- For fiberglass wrap: Saturate with water and wrap with tension, smoothing out air pockets
- For clamps: Position the rubber gasket squarely over the leak before tightening bolts evenly (do not overtighten)
Safety reminder: Wear nitrile gloves when handling chemicals. Avoid working near electrical fixtures without first cutting power.
Step 4: Allow Cure Time, Then Test and Monitor
Do not restore water flow until the manufacturer's minimum cure or set time has been met. Once water is restored, slowly increase pressure and inspect the repair area for seepage. Monitor over 24–48 hours for any recurrence of dripping or moisture buildup.
If the repair fails a second time, further patching is unlikely to hold. At that point, the pipe section likely needs professional assessment or full replacement.
Fix vs. Replace: How to Make the Right Call
Repair and replacement both have a place — the key variables are leak severity, pipe age, pipe material, system pressure, and the cost of downtime. A single small crack in an otherwise healthy pipe is a repair candidate, while a pipe showing multiple failure points, advanced corrosion, or material brittleness across its length is a replacement candidate.
Use these checkpoints to guide the decision:
Clear Decision Points
| Fix If | Replace If |
|---|---|
| The damage is localized (one crack or joint) | There are multiple leaks in close proximity |
| The pipe is less than 15-20 years old | The pipe material is severely degraded (brittle, warped, or UV-damaged) |
| The repair method can match the pressure rating required | The line carries potable water and a food-grade certified repair is not available |
| The line carries non-critical water | The pipe diameter and system pressure exceed the tolerance of available patch products |
Industrial HDPE Pipeline Considerations
Replacing large-diameter HDPE lines in mining, energy, or municipal infrastructure is often too costly and operationally disruptive to justify. The numbers make this clear:
- A 12-inch HDPE water line installation in Beaumont, TX bid at $75.00 per linear foot
- A LA HDPE slip-lining case reached $941,500 — roughly $557 per foot
- Large-diameter break analysis found that indirect costs — societal impact, lost service, downtime — consistently exceeded the utility's direct repair costs
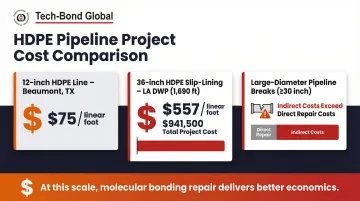
At that scale, a permanent molecular bonding repair delivers better economics and eliminates the disruption that full replacement requires.
Common Mistakes to Avoid and How to Prevent Future Plastic Pipe Leaks
Mistake 1 — Treating the Symptom, Not the Cause
Wrapping tape over a leak caused by a loose joint or high system pressure without fixing the underlying issue will result in repeat failures. Always trace the root cause — pressure spike, bad joint, UV degradation — before applying a patch.
If your system regularly exceeds rated pressure, install a pressure regulator. If joints are consistently failing, reassess installation techniques and cure schedules.
Mistake 2 — Using the Wrong Repair Product for the Pipe Material
Not all epoxies, tapes, or putties are compatible with all plastic pipe materials. Using a product not rated for PEX, HDPE, or high-pressure lines can cause the repair to fail immediately or degrade within weeks. Always confirm product compatibility before application. HDPE, in particular, cannot be repaired with standard adhesives due to its low surface energy.
Mistake 3 — Skipping Cure Time and Pressurizing Too Soon
Rushing back to full water pressure before epoxy or resin has cured is a common DIY error — it can blow out the repair entirely. Follow cure schedules strictly, especially for fiberglass wrap systems that may require hours to reach full strength.
Avoiding these mistakes gets you halfway there. The other half is building a maintenance routine that stops leaks before they start.
Preventive Tips
- Inspect visible plastic piping annually for surface cracks, discoloration, joint weeping, or unusual moisture
- Insulate pipes in areas subject to freeze-thaw cycles — freezing is a leading cause of plastic pipe failure
- Avoid over-pressurizing systems above rated specifications
- For industrial systems, establish a scheduled inspection protocol and document any repair history to identify patterns of recurring failure in specific pipe sections
- Implement leak detection programs: Leak detection success case
Frequently Asked Questions
Can you fix a plastic pipe leak without turning off the water?
Self-fusing silicone tape is specifically designed to be applied to live, flowing pipes for emergency situations. However, most other repair methods — epoxy putty, fiberglass wrap, couplings — require the water to be shut off and the pipe drained to achieve proper adhesion and a reliable seal.
What is the most permanent way to fix a cracked PVC pipe?
Cutting out the damaged section and installing a solvent-welded slip coupling is the most durable permanent solution for cracked PVC pipe. Tape and putty are temporary measures. For industrial-grade plastic pipes like HDPE, a molecular bonding patch system is the only option that provides a permanent, pressure-rated repair.
How long does a temporary plastic pipe repair last?
Self-fusing tape and epoxy putty repairs typically last 2–12 weeks, depending on pipe pressure, temperature, and how well the repair was applied — with higher-pressure systems failing sooner. Plan a permanent repair before the temporary fix fails.
Why don't standard adhesives and tapes work on HDPE pipes?
HDPE has an extremely low surface energy (31.6 dynes/cm), which prevents conventional adhesives from forming a chemical bond. Standard tapes can wrap around an HDPE pipe but will peel away under pressure. Repair requires a molecular bonding system — like Tech-Bond Global's Tech Patch Repair System — that crosslinks directly with the polymer surface rather than sitting on top of it.
How do I know if my plastic pipe needs repair or full replacement?
A single, localized crack or joint failure in an otherwise sound pipe is a strong repair candidate. Multiple failure points, advanced brittleness, severe UV degradation, or damage spanning a long section of pipe all indicate that replacement is the safer and more cost-effective long-term choice.
Is it safe to use epoxy putty on drinking water pipes?
Some epoxy putties carry NSF/ANSI 61 certification for potable water contact while others do not. Verify the product's certification before applying it to any drinking water pipe, and consult a licensed plumber for potable water applications.