Introduction
You're driving down the highway when you hear it: a loud hissing or rumbling from under your car that wasn't there before. The exhaust smell creeps into the cabin, and you know something's wrong. A quick look underneath confirms your suspicion—a cracked exhaust flex pipe.
For most DIYers, the immediate problem is twofold: you don't have access to a welder, and the shop quote just came back at $300 or more for what looks like a simple repair.
Exhaust flex pipe leaks are among the most common exhaust issues, and if caught early, most can be repaired at home without welding. This guide covers:
- How to identify the leak
- Which no-weld repair methods work best (and when)
- How to apply the fix step-by-step
- When the pipe is too far gone to patch
Key Takeaways
- Louder engine noise, hissing under load, exhaust smell in the cabin, and reduced performance signal a flex pipe leak
- Minor-to-moderate cracks and holes are fixable with exhaust tape, wrap kits, clamp-on sleeves, or patch systems
- The fix: cool the engine, locate and clean the leak, apply your repair method, and test
- Severely corroded, collapsed, or detached flex pipes need full replacement, not patching
- Never drive with an active exhaust leak; carbon monoxide buildup in the cabin is a serious safety hazard
What Is an Exhaust Flex Pipe?
The exhaust flex pipe is the corrugated, flexible metal section of your exhaust system positioned near the engine—typically between the exhaust manifold and the catalytic converter. It's designed to accommodate engine movement and absorb vibration as your engine shifts on its mounts during acceleration, braking, and normal operation.
This component serves two critical roles: it allows the engine to move without cracking rigid exhaust pipes, and it isolates vibration from the rest of the exhaust system to reduce noise and harshness in the cabin.
Flex pipes are high-stress components, which is why they wear out faster than most exhaust parts. They take a beating from multiple directions:
| Stress Type | Condition / Range | Mechanism | Consequence |
|---|---|---|---|
| Heat cycling | 600-1,000°F normal; >1,200°F under heavy load | Thermal expansion and contraction | Metal fatigue from cyclic stress |
| Movement fatigue | Thousands of flex cycles over vehicle life | Repeated bending and unbending at stress points | Progressive weakening of corrugated metal |
| Road debris impact | Constant rock, gravel, road grime contact | Mechanical impact from undercarriage | Surface damage and stress concentration |
| Corrosion | Moisture and road salt exposure | Chemical degradation of metal surface | Through-wall pitting and wall thinning |
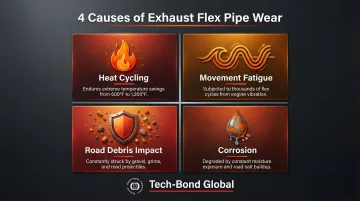
That combination makes the flex pipe among the most wear-prone parts of the entire exhaust system.
Signs and Root Causes of an Exhaust Flex Pipe Leak
Recognizing the Symptoms
The most recognizable symptom is a noticeably louder exhaust note or a hissing/tapping sound from under the car that intensifies when the engine is under load or accelerating.
Additional signs include:
- Exhaust smell inside the vehicle (especially at idle or with windows down)
- Visible carbon soot deposits or discoloration around the flex pipe
- Vibrations felt through the floor or pedals
- In severe cases, a visibly cracked or hanging pipe section
What Causes Flex Pipe Failure
Those symptoms trace back to a few predictable failure points:
- Metal fatigue — Years of constant flexing and thermal expansion cycles weaken the corrugated metal
- Corrosion and rust — Accelerated by road salt, moisture, and exhaust condensation
- Physical damage — The vehicle bottoms out and the pipe strikes the road surface
- Improper installation — Misaligned exhaust hangers put uneven stress on the flex section
Why You Shouldn't Ignore It
Left unaddressed, a flex pipe leak compounds quickly:
- Escalating exhaust noise as the gap widens
- Exhaust fumes entering the cabin — a direct carbon monoxide hazard
- Oxygen sensor damage from exposure to unfiltered exhaust gases
- Accelerated deterioration of surrounding exhaust components
OSHA limits workplace CO exposure to 50 ppm over an 8-hour period. A leaking flex pipe bypasses the catalytic converter, allowing unfiltered exhaust gases — including high CO concentrations — to escape before treatment.
How to Fix an Exhaust Flex Pipe Leak Without Welding (Step-by-Step)
No-weld repair is viable for cracks, small holes, and pinholes—but only if the flex pipe is structurally sound. Attempting to patch a pipe that is severely rusted through, collapsed, or broken at the end fittings will not hold.
Step 1: Safety Preparation and Leak Location
Safety first:
- Let the engine cool completely (minimum 2 hours)
- Lift and support the vehicle on jack stands—never work under a car on just a floor jack
- Wear heat-resistant gloves and safety glasses
Locate the exact leak:
- With the engine warm (but not hot enough to burn), listen from underneath for hissing
- Use a flashlight to look for soot staining or carbon deposits around the flex pipe surface
- Carefully hold a hand near (not on) the pipe while idling to feel escaping gas
Step 2: Clean and Prepare the Repair Surface
No repair method—tape, wrap, or patch—will bond to a dirty or rusty surface.
Preparation steps:
- Use a wire brush or metal file to remove loose rust, scale, and debris from around the crack or hole
- Wipe the cleaned area with a rag to remove dust
- Allow the pipe to cool to ambient temperature before applying any repair product
Surface prep is non-negotiable. Skipping this step guarantees failure within days.
Step 3: Choose and Apply the Right No-Weld Repair Method
Your choice of repair method depends on the size of the damage and how much clearance you have around the pipe. Use the options below to match your situation.
Method 1: Exhaust Repair Tape or Bandage Wrap
High-temperature exhaust repair tape is wrapped tightly around the damaged area in overlapping layers. It's the quickest option, but expect the shortest lifespan of any no-weld approach. Best for: Small surface cracks and temporary fixes.
Method 2: Clamp-On Repair Sleeve
A split exhaust repair sleeve (or band clamp with a steel patch) is positioned over the leak and tightened with bolts to physically compress a seal against the pipe.
Best for: Mid-pipe leaks where you have enough clearance and a relatively intact pipe wall
Important: Clamps require a minimum of 40mm of straight, structurally sound pipe to achieve a proper seal. They cannot seal properly over deformed, severely rusted, or curved pipe sections.
Method 3: High-Performance Repair Wrap
Wrap-based repair systems use woven fabric saturated with a binding compound and layered over the damaged area. Systems like basalt or titanium exhaust wraps, rated to 1,800°F, create a durable, heat-resistant bond that outperforms standard fiberglass wraps.
Normal exhaust temperatures range from 600°F to 1,000°F, so confirm your wrap is rated well above that before purchasing. Best for: Moderate cracks requiring a longer-lasting no-weld fix.
Method 4: Exhaust Patch Kit with Putty
The two-component approach: exhaust repair putty or paste is pressed into the crack first to fill gaps, then covered and secured with a metal patch band and clamps.
Permatex Muffler & Tailpipe Sealer is rated to 2,000°F and provides a permanent seal when properly applied. It requires 24-hour cure time with heat cycling.
Best for: Small holes where the surrounding metal is still solid
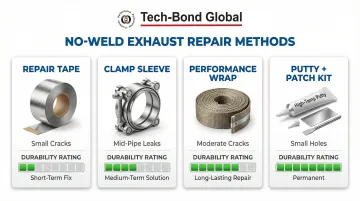
Quick comparison — which method fits your situation?
| Method | Best For | Durability |
|---|---|---|
| Repair tape | Small surface cracks | Short-term |
| Clamp sleeve | Mid-pipe leaks with straight pipe | Medium |
| Performance wrap | Moderate cracks | Long-lasting |
| Putty + patch kit | Small holes with solid pipe wall | Permanent (with cure) |
Step 4: Test and Validate the Repair
Immediate test:
- Start the engine and let it idle for 5–10 minutes
- From a safe distance, check for any remaining hissing sound or visible smoke/soot escaping from the repaired area
Road test:
- Take a short drive, then re-inspect the repair once the pipe has cooled
- Ensure there is no separation, cracking, or gas escaping around the edges
- Tighten any clamps if needed
Fix vs Replace: Which Is Right for Your Situation?
The choice comes down to the extent of the damage, the age and condition of the surrounding pipe, and how long you need the repair to last.
Patch and Repair When:
- The damage is a single crack or small hole
- The flex pipe body is still structurally intact (no severe corrosion or thinning)
- The pipe is not detached at either end fitting
Replace the Flex Pipe When:
- The pipe is collapsed or the braided mesh has broken apart
- Corrosion has thinned the pipe wall across a wide area making patching impractical
- The pipe is hanging or detached from its mounting points
If replacement is the right call, the DIY cost is more manageable than most expect. Direct-fit flex pipe sections typically run $88 to $309 depending on the vehicle, compared to $1,100 to $1,200 for professional replacement.
Consider Professional Help When:
- The flex pipe is welded in (not clamped)
- You cannot safely access the underside
- The damage has spread to adjacent components like the catalytic converter or manifold flange
Common Mistakes to Avoid
Most exhaust flex pipe repairs fail not because the method is wrong, but because of avoidable prep and material errors. Watch out for these:
| Mistake | Cause | Failure Result | Prevention |
|---|---|---|---|
| Hot or dirty surface application | Skipping surface prep and cooling time | Repair fails within days | Cool pipe completely; clean and dry surface before applying |
| Wrong material heat rating | Using products below required temp threshold | Material burns off immediately | Verify product heat rating matches exhaust temps (600-1,000°F+) |
| Patching deteriorated metal | Attempting repair on paper-thin or heavily rusted pipe | Patch has nothing solid to grip | Inspect 2-inch radius; replace if wall integrity compromised — consider emergency pipe repair clamps for interim containment |
| Skipping post-repair test | Declaring job done without thermal cycling | Repair fails under heat and back pressure | Run engine to operating temp and re-inspect |
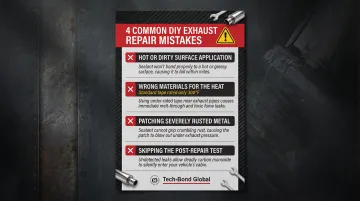
Catching these mistakes before you start saves you from pulling out the wrench a second time.
Frequently Asked Questions
How much does it cost to repair an exhaust flex pipe?
DIY no-weld repair materials typically cost between $5 and $20, while professional shop replacement averages $1,100 to $1,200 including labor. Direct-fit replacement pipes for DIY installation range from $88 to $309 depending on your vehicle.
Can an exhaust flex pipe be repaired?
Yes, minor cracks and holes can be repaired without welding using wrap systems, exhaust tape, or clamp-on sleeves. However, structurally compromised or collapsed pipes require full replacement—patching cannot restore structural integrity.
How long does it take to repair an exhaust flex pipe?
A DIY no-weld repair typically takes 1–2 hours including cooling time, surface prep, and application. High-temperature putties and wraps may require additional 24-hour curing time depending on the repair method chosen.
Can I drive my car with a broken exhaust flex pipe?
Driving with a leaking flex pipe is unsafe—exhaust fumes, including carbon monoxide, can enter the cabin. CO exposure above 50 ppm is hazardous. Address the leak before driving the vehicle again.
How do I know if my exhaust flex pipe is leaking?
Common signs include louder exhaust noise, a hissing sound under acceleration, exhaust smell inside the cabin, visible soot or discoloration around the flex pipe, and increased vibration through the floor or pedals.
Is a no-weld exhaust flex pipe repair permanent?
Durability depends on the repair method. High-temperature putties and wraps rated to 2,000°F last significantly longer than basic tape, but all no-weld repairs should be monitored regularly—if the pipe is structurally weakened, full replacement is the more reliable long-term fix.