Introduction
The sharp smell of gasoline in your garage. A dark puddle spreading under your parked car. A fuel gauge dropping faster than your mileage can explain. Each is a warning sign — and none of them can wait.
Fuel system leaks rank among the most common yet hazardous vehicle problems, affecting everything from daily commuter sedans to industrial fleet trucks and heavy equipment. While the symptoms might seem minor at first, the underlying causes stem from predictable failure points in your fuel delivery system that, left unaddressed, escalate from nuisance to danger in a matter of days.
This guide walks you through the complete repair process — from recognizing early warning signs and diagnosing the root cause, to executing the right repair method and preventing recurrence.
Whether you're dealing with a cracked rubber hose, corroded metal line, degraded injector seal, or damaged tank, you'll find a clear path to fixing it safely.
Key Takeaways
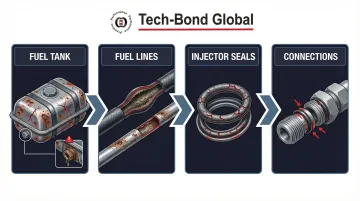
- Fuel leaks occur in four primary areas—fuel lines, tanks, injector seals, and connections—each with its own correct fix
- Never drive with an active fuel leak; vapor ignition near hot exhaust creates immediate fire and explosion risk
- Most minor-to-moderate leaks can be repaired without full component replacement when diagnosed and treated correctly
- Follow four steps to repair: depressurize the system, locate the exact leak, apply the correct method, then test under pressure
- Molecular bonding solutions for HDPE and polymer fuel tanks outlast epoxy patches — and hold under pressure
Understanding the Fuel System: How It Works and Why It Leaks
Your vehicle's fuel system is a pressurized chain with no margin for failure. Fuel flows from the tank through lines to a pump, passes through a filter, and reaches the engine via injectors (or a carburetor in older vehicles). Modern Gasoline Direct Injection (GDI) systems operate at pressures up to 2,200 psi at full load, with a low-pressure pump in the tank feeding a camshaft-driven high-pressure pump. Any component failure in this high-pressure delivery system is a potential leak source.
Four components fail most frequently:
| Component | Failure Mechanism | Root Cause | Hazard |
|---|---|---|---|
| Fuel tank | Through-wall pitting (metal); cracking (HDPE) | Road salt corrosion; impact damage; age-related brittleness | Fuel leak; environmental contamination |
| Fuel lines | Cracking, swelling, external corrosion | Age and ethanol exposure (rubber); water trapping under brackets (metal) | Fuel leak near ignition sources |
| Fuel injector seals | O-ring degradation | Heat cycling over time | Fire hazard near hot engine components |
| Fuel system connections | Loosening fittings; O-ring failure | Vibration (quick-connect/C-clips); sustained pressure cycling | Pressurized fuel release |
Warning Signs to Watch:
- Strong gasoline odor near the vehicle, especially when parked or idling
- Visible wet spots or puddles under the car (gasoline is clear to amber and evaporates quickly due to its Reid Vapor Pressure between 7.8-9.0 psi)
- Noticeable drop in fuel efficiency without changes in driving habits
- Rough idling or engine misfires from inconsistent fuel pressure
- Check Engine Light triggered by fuel pressure drop detected by sensors
Why You Can't Wait:
Ignoring these signs escalates risk fast. Vehicle fuel leak fire statistics are well-documented — the fire risk alone makes delay dangerous. Beyond safety, gasoline leaching into soil creates lasting groundwater contamination. And progressively, the damage spreads: a small leak today means a failed pump, damaged injectors, and repair bills far exceeding what early intervention would have cost.
How to Fix a Fuel System Leak: Step-by-Step
Attempting a repair without isolating the exact leak source and component type leads to failed patches, wasted materials, and recurring leaks. The process below ensures your fix addresses the actual problem.
Step 1: Prioritize Safety and Depressurize the System
Non-negotiable safety steps before touching any fuel system component:
- Park in a well-ventilated outdoor area away from ignition sources, pilot lights, or electrical equipment
- Disconnect the vehicle battery negative terminal to eliminate spark risk
- Remove the fuel pump fuse or relay (consult your owner's manual for location)
- Start the engine and let it idle until it stalls, then crank for 5 seconds to release residual manifold pressure
- Keep a rated fire extinguisher within arm's reach throughout the repair
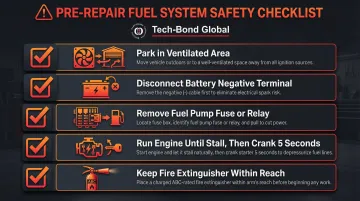
Critical: Always follow OEM fuel system safety procedures to prevent high-pressure fuel spray. Working on a pressurized system—even for what appears to be a minor leak—can cause fuel to spray with enough force to reach ignition sources or saturate clothing.
Step 2: Locate and Diagnose the Exact Leak Source
Inspection process:
- Trace the fuel system with a flashlight from tank to engine, looking for damp sections, discolored areas, cracked or swollen rubber hoses, corroded metal lines, and wet spots around injector bases or fittings
- Spray soapy water on suspect areas and watch for bubbles—a reliable leak indicator for pressurized components
- Check mounting points and brackets where corrosion concentrates due to trapped moisture
Distinguish leak types by location:
- Drip under rear of vehicle: Fuel tank, filler neck, or drain plug issue
- Wet spot mid-vehicle along underside: Fuel line (rubber or metal) leak
- Smell or residue near engine bay: Injector seals or connection fitting leak
- Fuel odor inside cabin: EVAP system or filler neck seal failure
Document before you repair: Note the leak location, size, and apparent severity. Take photos. This determines whether a patch, section replacement, or seal swap is appropriate and provides a baseline for post-repair validation.
Step 3: Apply the Correct Repair Based on Leak Type
The repair method varies entirely based on what component is leaking and what it's made of. Using the wrong fix for the component type is the most common reason fuel system repairs fail.
If the Leak Is in a Soft Rubber Fuel Hose
Repair process:
- Use a tubing cutter or sharp blade to cut out the damaged section (cut at least 1 inch beyond visible damage on each side)
- Slide hose clamps onto both cut ends before joining
- Insert a fuel-rated barbed connector between the sections
- Position clamps over the barbed connector and tighten to specification (snug but not crushing the hose)
Material requirement: Replacement hose and connectors must meet SAE J30R9 standards for fuel injection systems and SAE J30R14T2 for low-permeation CARB/EPA compliance. Elastomer performance varies significantly with ethanol exposure.
If the Leak Is in a Hard Metal Fuel Line
Repair process:
- Use a tubing cutter to remove the damaged section cleanly (avoid hacksaw cuts that leave burrs)
- Deburr cut ends with a deburring tool or fine file
- Join new compatible tubing using compression fittings or 37-degree/45-degree flare connectors per SAE J514 and SAE J512 standards
- Tighten fittings to specification using a torque wrench—never exceed maximum torque
Torque specifications (SAE J514 37° flared fittings, steel):
| Tube Size | Min Torque | Max Torque |
|---|---|---|
| 1/4 inch | 10 lb-ft | 11 lb-ft |
| 5/16 inch | 13 lb-ft | 15 lb-ft |
| 3/8 inch | 17 lb-ft | 19 lb-ft |
| 1/2 inch | 34 lb-ft | 38 lb-ft |
Caution: Over-torquing causes micro-cracks in flares that leak immediately or fail within weeks. Metal line repairs near the fuel tank or in tight undercarriage spaces require a lift and are best left to professionals with proper access.
If the Leak Is in the Fuel Tank
For minor cracks or pinholes in metal tanks:
- Clean the area to bare metal using 80-grit sandpaper
- Degrease thoroughly with brake cleaner and let dry completely
- Apply a fuel-resistant epoxy patch compound, pressing flat over the hole
- Allow full cure time (24-48 hours typical) before refilling or pressurizing
For polymer and HDPE fuel tanks:
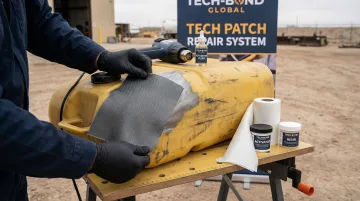
Standard epoxies exhibit weak adhesion to HDPE due to the polymer's low surface energy and non-polar chemistry. Without surface pretreatment, epoxy-to-HDPE joints suffer adhesion failure, particularly under thermal cycling and fuel exposure.
That's where a molecular bonding approach changes the outcome. Tech-Bond Global's Tech Patch Repair System (TPRS) uses a patented process that crosslinks with the polymer substrate at the molecular level—the repair becomes structurally integrated with the tank rather than sitting on top of it.
Key attributes of TPRS for polymer fuel tank repair:
- Patch material: PTFE-coated E-glass fabric, resistant to gasoline, diesel, and ethanol blends across all common grades
- Bond type: Molecular crosslinking via controlled chemical activation—not adhesive grip
- Flexibility: The bond moves with the substrate, preventing the stress cracks that fracture rigid epoxy patches during thermal cycling
- Deployment: No specialized equipment required; field-applicable for fleet, industrial, and off-road applications
If the Leak Is from Injector Seals or Loose Connections
Injector seal replacement:
- Depressurize the system completely (Step 1)
- Remove the fuel rail (unbolt rail mounting bolts and disconnect fuel line)
- Extract old seals using a small pry tool or pick (avoid scratching injector body)
- Install new fuel-rated O-rings and seals onto each injector
- Reinstall the fuel rail and torque all bolts to OEM specification
Critical: Always follow OEM injector seal guidance from the fuel rail or cylinder head. Using non-OEM or incompatible seals causes premature re-leaking. Specify FKM (Viton) elastomers for modern ethanol-blended fuels and high-heat environments.
For loose connections and fittings:
- Check all quick-connect fittings for proper engagement and intact locking clips
- Inspect C-clips and O-rings for wear, cracking, or compression set
- Replace worn components rather than simply retightening—degraded seals will leak again under pressure
Step 4: Test and Validate the Repair
Post-repair verification process:
- Static pressure test: Reconnect the battery and fuel pump fuse. Turn ignition to "ON" without starting the engine to allow the system to pressurize. Inspect all repaired areas for drips or fuel odor. Wait 5 minutes and re-inspect.
- Running test: Start the engine and let it idle for several minutes. Check for leaks at idle and at 2,000 RPM (higher fuel pressure).
- Drive test: Perform a short test drive covering normal operating conditions. Monitor for fuel odor in cabin or visible drips.
- Cool-down inspection: Re-inspect all repaired areas immediately after the drive and again after the vehicle has fully cooled to catch heat-cycle-related seepage.
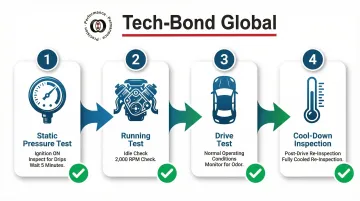
If any leak reappears during testing, do not continue driving. Re-diagnose and address the root cause before returning the vehicle to service.
Fix vs Replace: Making the Right Call
The decision to repair or replace a fuel system component depends on a few key factors: how severe and localized the damage is, the age and material of the component, and whether a repair can hold up under sustained fuel pressure and temperature cycling.
Clear "Fix" Scenarios:
- A pinhole or hairline crack in a structurally sound tank with no widespread corrosion
- A single section of cracked rubber hose (6 inches or less) without corrosion spreading to fittings
- A worn injector seal on an otherwise intact, functioning injector
- A loose fitting that has caused seepage but shows no structural failure, stripped threads, or corrosion
Clear "Replace" Scenarios:
- Extensive corrosion running the length of a metal fuel line (patching one section leaves adjacent corroded areas ready to fail)
- A tank with significant physical impact damage, deep dents, or rust perforation across a large area
- Tank inspection failure criteria include significant physical impact damage, deep dents, or rust perforation across a large area
- An injector showing internal contamination or electrical failure (not just a seal issue)
- Any component where repeated repairs have already been attempted and failed
- Components over 10 years old showing brittleness, widespread cracking, or material degradation
Cost Context:
Replacement costs vary widely depending on the component — here's what typical jobs run:
- Fuel injector replacement averages $741–$927 (parts $464–$521, labor $277–$406)
- Tank replacement typically costs $1,290–$1,331 for parts plus $367–$539 for labor
- Fuel line replacement ranges $300–$500 for simple hoses, $300–$2,000 for complex steel lines
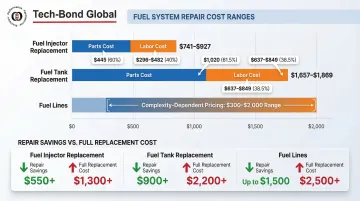
Labor accounts for a substantial share of these totals — vehicle lifting, shielding removal, and routing complexity add up fast. If the component is structurally sound, a proper repair gets you back to the same safety and performance standard without the full replacement bill.
Common Mistakes to Avoid and How to Prevent Future Leaks
Four Repair Errors That Cause Callbacks
Skipping surface cleaning and degreasing — Fuel dissolves residual oils at the bond interface, causing adhesion failure within days or weeks.
Using non-fuel-rated materials — Hoses, connectors, or patch compounds that aren't rated for fuel will swell, soften, or dissolve in ethanol-blended gasoline and re-leak quickly.
Skipping post-repair pressure testing — Secondary leaks that develop under load, vibration, or thermal cycling stay hidden until a more serious failure occurs.
Treating the symptom, not the cause — Re-sealing a tank without addressing the underlying overpressure issue, misaligned drain plug, or corroded mounting bracket means the leak comes back.
Avoiding these mistakes is half the battle. The other half is consistent preventive maintenance — here's what that looks like in practice.
Prevention Checklist
- Inspect rubber fuel hoses every 6 months for cracks, bulges, brittleness, or soft spots (squeeze hoses—they should feel firm and uniform)
- Check metal lines seasonally in regions where road salt is used; corrosion from road salt accelerates metal line failure
- Wash undercarriage after winter to remove accumulated salt deposits
- Always replace O-rings and seals when any fuel system component is disassembled, even if they appear intact
- Avoid overfilling the tank to prevent pressure buildup in the EVAP system
- Address Check Engine Lights and fuel odors immediately rather than monitoring over time
Why Component Quality Determines Long-Term Outcome
Substandard aftermarket hoses and seals are a recurring culprit in repeat fuel leaks. OEM-equivalent, fuel-rated components cost more upfront — but that premium is modest compared to the potential cost of fire damage, environmental remediation, or engine failure from fuel starvation. Buying right the first time is simply cheaper.
Conclusion
Successful fuel system leak repair comes down to the same fundamentals every time: catch warning signs early, diagnose the source before touching any repair material, and match the repair method to the specific component and damage type.
Most fuel system leaks are fixable without full component replacement when caught at the right stage. The difference between a repair that lasts weeks and one that lasts for the life of the vehicle comes down to materials, process, and validation. A permanent, materials-appropriate repair prevents repeat failures, protects your vehicle and its occupants, and keeps fuel contamination out of the environment. A temporary stopgap buys time — a proper repair buys years.
The repair method matters as much as the decision to repair. SAE-rated hose materials, OEM-quality injector seals, and molecular bonding systems for polymer tanks each exist because one solution doesn't fit every substrate. Choose the right material for the job, validate the repair under pressure before driving, and you won't need to revisit it.
Frequently Asked Questions
How much does it cost to fix a fuel system leak?
Typical repair costs break down by severity:
- Minor fixes (loose connections, seal replacements): $50–$150
- Rubber hose section repairs: $300–$500
- Injector or tank replacements: $741–$1,869
Labor drives the majority of complex repair costs due to system access and depressurization requirements.
Can you still drive with a fuel leak?
No. Driving with a fuel leak is dangerous regardless of leak severity. Fuel vapor near a hot exhaust or electrical spark can ignite, creating immediate fire risk. Move the vehicle to an open, well-ventilated area and address the leak before operating it again.
How do I know if my fuel system is leaking?
Watch for these warning signs:
- Persistent gasoline odor, especially when parked
- Visible puddles or wet spots under the vehicle
- Unexplained drop in fuel efficiency with no change in driving habits
- Check Engine Light triggered by low fuel pressure sensors
What causes a fuel line to leak?
Common causes include:
- Rubber hose degradation from age and ethanol fuel exposure
- Metal line corrosion accelerated by road salt
- Physical impact damage from road debris
- Loose or failed connections from vibration and thermal cycling
Can a fuel system leak be repaired without replacing the entire line or tank?
Yes. Minor-to-moderate leaks in hoses, tanks, and connections can be repaired without full replacement—provided the damage is localized, the repair material is fuel-rated and properly applied, and the system is tested under pressure afterward to validate the fix.
How long does a fuel system leak repair last?
Durability depends on the repair method. Temporary epoxy patches may last several months, while permanent molecular-bonding repairs or OEM-quality component replacements can last the life of the vehicle when properly applied and pressure-tested.