Introduction
A single damaged pipe can waste thousands of gallons of water, compromise structural integrity, and bring industrial operations to a halt. Left unaddressed, what starts as a small leak becomes an expensive emergency.
Burst pipe claim costs are significant, while preventive repairs typically cost $181 to $497. For industrial pipelines, a single failure can halt entire production lines.
Whether you're dealing with a hairline crack or a full pipe failure, the right repair approach makes all the difference. This guide covers:
- Common pipe damage types and root causes
- Step-by-step repair procedures
- Temporary vs. permanent repair methods
- When to repair vs. replace
- How to avoid the most common repair mistakes
Key Takeaways
- Most pipe damage falls into four categories: pinhole leaks, joint failures, bursts, or corrosion
- Temporary fixes (tape, epoxy putty, clamps) stop leaks fast but aren't permanent solutions
- Slip couplings work for metal and PVC; molecular bonding systems handle polymer pipes like HDPE where traditional methods fail
- Replace when corrosion is widespread, failures are recurring, or the pipe is past its service life
- Always pressure-test after any repair before returning the line to service
Common Types of Pipe Damage and Why They Happen
Pipe failures follow predictable patterns. Correctly identifying the damage type is your first step. Guessing the fix without understanding the failure leads to repeat problems within weeks.
Pinhole Leaks and Hairline Cracks
Symptoms:
- Slow drip from pipe surface
- Damp spots on walls or floors
- Subtle water stains on ceilings
- Discoloration along pipe runs
Likely causes: Corrosion eating through metal pipe walls, or micro-fractures from water hammer (sudden pressure surges from rapid valve closure) and pressure fluctuations. Metal pipes develop pinhole leaks as the interior surface oxidizes over years. PVC and PEX can crack under repeated pressure spikes or freezing temperatures.
Joint and Connection Failures
Symptoms:
- Visible pooling water at connection points
- Loose or weeping fittings
- Water stains directly beneath joints
- Drips that start and stop with water use
Likely causes: Joints are the weakest points in any pipe system — they rely on compression seals that degrade with age. Common culprits include worn-out rubber washers, incorrectly applied thread tape, and thermal expansion that gradually loosens fittings over time.
Burst or Severely Cracked Pipes
Symptoms:
- Sudden gush of water
- Dramatic pressure drop throughout the system
- Flooding in walls, ceilings, or floors
- Complete loss of water flow
Likely causes: Freezing temperatures cause pipe bursts when outdoor temperatures drop below 20°F, as expanding ice cracks pipe walls. Aging pipes that have thinned from corrosion also fail suddenly under sustained pressure. The 2021 winter storms alone caused $18 billion in pipe damage claims.
Corrosion and Deterioration
Symptoms:
- Discolored water (rust-brown or green-tinted)
- Flaking material inside the pipe
- Visible rust or green oxidation on exterior
- Reduced water pressure over time
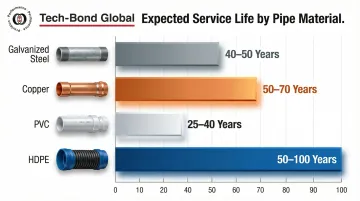
Likely causes: Corrosion results from chemical reactions between pipe material and water chemistry — or simply from pipes reaching the end of their service life. Expected lifespans vary significantly by material:
| Pipe Material | Typical Lifespan |
|---|---|
| Galvanized steel | 40–50 years |
| Copper | 50–70 years |
| PVC | 25–40 years |
How to Repair a Pipe: Step-by-Step Guide
Skipping diagnosis and jumping straight to a fix is the most common reason repairs fail. The right repair method depends entirely on the damage type, pipe material, and operating pressure.
Step 1: Shut Off the Water Supply and Drain the Line
Locate the main shut-off valve—typically in the basement, crawl space, or near the water meter—and close it completely. Open the lowest faucet in your home or system to drain residual water from the line.
Why this matters: No repair material bonds correctly to a wet surface, and working pressure can turn a minor leak into a flood the moment you touch the damaged area.
Step 2: Identify and Assess the Damage
Inspect the pipe under good lighting. Note:
- Exact location of the failure
- Length and type of damage (crack, hole, corrosion, joint failure)
- Pipe material (copper, PVC, PEX, HDPE, galvanized steel)
- Whether the failure is at a joint, along a straight run, or at a fitting
Document with photos if possible. This assessment determines which repair method will actually hold.
Step 3: Clean and Prepare the Repair Area
Dry the pipe surface thoroughly. For metal pipes, lightly sand any rust or oxidation from the repair area using 80-grit sandpaper. For plastic pipes, wipe clean with a dry cloth and ensure no moisture remains.
Critical: Surface preparation is where most DIY repairs fail. A bond applied over moisture, oil, or debris will fail within days.
Step 4: Apply the Appropriate Repair Method
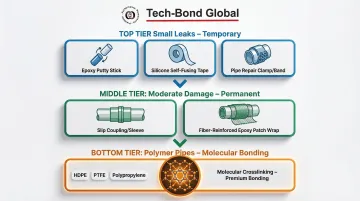
Choose your repair method based on damage severity:
For small leaks (temporary):
- Epoxy putty for pinhole leaks
- Self-fusing silicone tape for hairline cracks
- Repair clamps for accessible straight runs
For moderate damage (permanent):
- Slip coupling for cut-and-replace repairs on metal or PVC
- Fiber-reinforced patch systems for industrial applications
- Molecular bonding systems for polymer pipes like HDPE, polypropylene, or PTFE — standard adhesives cannot form a durable bond on these surfaces. Tech-Bond Global's Tech Patch Repair System (TPRS) addresses this through a patented process that creates molecular crosslinks directly at the pipe surface, producing repairs that hold under pressure where conventional methods fail.
Step 5: Test the Repair Under Pressure
Restore water pressure gradually. Monitor the repaired area for 10-15 minutes. Check for:
- Seepage at the repair edges
- Weeping along the pipe in both directions
- Pressure drop in the system
If any leakage appears, do not increase pressure. Re-assess the seal, re-clean the surface if needed, and reapply the repair material before proceeding.
Pipe Repair Methods: Temporary vs Permanent Solutions
Choosing the wrong repair method for the damage severity is one of the costliest mistakes. Temporary materials used in permanent applications will eventually fail, often at the worst possible time.
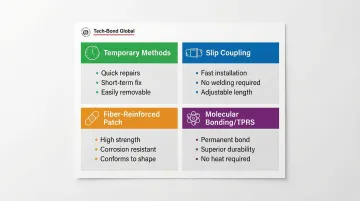
Temporary Fixes: When Speed Matters
Use these methods only when a permanent solution is coming within days:
- Epoxy putty: Hardens over the leak site; works on small holes up to ¼ inch
- Self-fusing silicone tape: Creates a pressure-resistant wrap; handles up to 80 psi temporarily
- Repair clamps: Mechanically compress a rubber gasket over the damage; effective for straight pipe runs
None are designed for long-term use under sustained pressure. They stop active leaks while you arrange permanent repair or replacement.
Permanent Fix for Metal and PVC Pipes: Slip Coupling Method
For leaks that cannot be sealed on the surface, cut out the damaged section using a pipe cutter. Deburr both cut ends with a reaming tool, then install a slip coupling that bridges the gap.
Slip couplings are a code-compliant, field-tested repair method for metal and PVC pipe. The coupling must match the pipe's exact diameter and material.
Application:
- Measure and cut out the damaged section (usually 1-2 inches beyond visible damage)
- Slide the coupling onto one pipe end
- Align both cut ends inside the coupling
- Tighten compression rings or apply PVC cement as required
This method restores full structural integrity and pressure rating.
When Conventional Repair Methods Fail: HDPE and Polymer Pipes
Standard repair tapes, epoxy compounds, and slip couplings are ineffective on HDPE and other polymer pipes because adhesives cannot bond at the molecular level to these materials.
HDPE, polypropylene, and PTFE have low surface energy — conventional adhesives cannot form strong bonds with these materials. Surface-level glues peel off under pressure or thermal cycling.
Tech-Bond Global developed TPRS to solve this directly. Rather than relying on surface adhesives, the system uses a patented polymer bonding process that creates crosslinks at the molecular level. In spring 2023, TPRS repaired a 78-inch HDPE pipe for Borouge in Abu Dhabi — field-proven performance under extreme industrial conditions.
Repair Cast and Fiber Wrap Systems: Mid-Tier Permanent Option
Repair casts combine epoxy putty with fiberglass or PTFE-coated fabric wrap. These offer stronger hold than tape alone for pinhole leaks on straight pipe runs.
Performance factors:
- Fiberglass wrap: Standard option; limited chemical resistance
- PTFE-coated E-glass fabric: Superior in chemical resistance, heat tolerance, and mechanical strength
- Pressure rating: Varies by wrap material and application thickness; rated to 150–300 psi rated to 150–300 psi depending on application thickness
These work well on metal and ceramic pipe surfaces but vary significantly in chemical and pressure resistance depending on the wrap material.
Once you understand each method's limitations, matching the right repair to your situation becomes straightforward.
Choosing the Right Method: A Quick Decision Framework
Use temporary methods when:
- A permanent fix is scheduled within 48-72 hours
- You need to stop an active leak immediately
- The repair is a stopgap until replacement
Use slip coupling when:
- Pipe material is PVC, copper, or galvanized steel
- Damage is localized to a 2-4 inch section
- The rest of the pipe system is sound
Use fiber-reinforced patch systems when:
- Damage area is larger than 4 inches
- Pipe is under sustained pressure (industrial applications)
- You need chemical or heat resistance
Use TPRS or molecular bonding systems when:
- Pipe material is HDPE, polypropylene, PTFE, or other polymer
- Conventional adhesives have failed before
- Replacement cost or downtime is prohibitive
Fix vs Replace: How to Decide
Deciding whether to repair or replace comes down to a practical question: is the damage contained, or has the system degraded past the point where repairs hold up?
For industrial pipelines, unplanned replacement carries massive downtime costs that make effective repair highly valuable.
Repair if the Damage Is Localized and the Rest of the System Is Sound
A single cracked joint, one corroded section, or one impact-damaged pipe section on an otherwise healthy line is a strong candidate for repair. The cost and disruption of replacing the full run is not justified.
When repair makes sense:
- Damage is isolated to one area
- The pipe material is mid-life or newer
- The rest of the system shows no corrosion or wear
- Repair cost is less than 30% of replacement cost
For industrial HDPE or polymer pipe with isolated damage, molecular bonding repair systems can restore structural integrity often at under 30% of replacement cost.
Replace When Corrosion Is Widespread, Material Is End-of-Life, or Failures Are Recurring
Some situations make repair the wrong call. If multiple sections show corrosion, if the same area has been patched more than once, or if the pipe material has reached end of service life, replacement is the safer and more economical path forward.
Average pipe service life by material:
- Galvanized steel: 40–50 years
- Copper: 50–70 years
- PVC: 25–40 years
- PEX: 40–50 years (estimated; relatively new material)
- HDPE: 50–100 years (when not damaged)
If your pipe is within 10 years of its expected end-of-life, replacement is the better investment.
Common Mistakes to Avoid and Preventive Tips
Common Repair Mistakes
Three mistakes account for the majority of failed pipe repairs:
- Patching the wrong spot: Water travels along the pipe before dripping, which means the visible leak point is often inches from the actual failure. Probe the surrounding area before committing to a patch location.
- Using the wrong repair material: Standard epoxy won't hold on HDPE. Over-tightened clamps crack PVC. Match your repair product to the pipe material — or use a molecular bonding system rated for the specific substrate.
- Skipping the pressure test: A seal that looks solid at zero pressure can fail immediately under normal operating conditions. Restore pressure gradually and hold at operating pressure for 10-15 minutes before closing up the repair area.
Preventive Maintenance Tips
Getting ahead of pipe failures is far cheaper than responding to them. These habits make a measurable difference:
Inspect pipe runs every 6-12 months. Look for early corrosion, joint weeping, or surface discoloration. Catching a hairline crack before it becomes a burst pipe eliminates emergency repair costs entirely.
Control water pressure: The Uniform Plumbing Code and International Residential Code require pressure-reducing valves when static water pressure exceeds 80 psi. The EPA WaterSense program recommends an optimal range of 45 to 60 psi to minimize system stress and leaks.
Protect pipes from freezing: Pipes are at high risk of bursting when outdoor temperatures drop below 20°F. Insulate pipes in crawl spaces, attics, and exterior walls. Maintain indoor temperatures of at least 55°F to 65°F, even when buildings are unoccupied.
Replace aging seals proactively: Rubber washers and seals cost pennies but prevent leaks that cost thousands. Replace them every 5-7 years or at the first sign of cracking.
Frequently Asked Questions
How do you repair a damaged pipe?
The right method depends on pipe material and damage type. Small leaks can be temporarily sealed with epoxy putty or a pipe clamp. For permanent repair on metal or PVC, cut out the damaged section and install a slip coupling. HDPE and other polymer pipes require a molecular bonding system like TPRS — conventional adhesives won't hold.
How much does a plumber cost to fix a pipe leak?
Standard plumbing repairs cost between $181 and $497, with a national average of $339. Leaking pipes typically range from $175 to $550 for minor to moderate repairs. Burst pipe repairs average $500 but can range from $200 to $3,000 depending on location and damage extent. Emergency after-hours service costs 1.5 to 3 times standard rates.
Can you repair a pipe without replacing it?
Yes. Localized damage on metal, PVC, or PEX can be permanently repaired with slip couplings or patch systems. HDPE pipes historically required full section replacement, but molecular bonding repair systems now make non-replacement repair possible on those materials too.
What is the best method to permanently repair a pipe?
Slip couplings are the standard for permanent repair on metal and PVC — cut out the damaged section and bridge the gap with a coupling matched to pipe diameter and material. For HDPE and other polymer pipes, a molecular-bonding patch system is required since standard adhesives cannot form a durable bond on these surfaces.
Can HDPE pipes be repaired?
Yes, with the right system. Traditional tapes and adhesives fail on HDPE because they rely on surface adhesion, and HDPE resists it. Tech-Bond Global's TPRS creates crosslinks at the polymer surface level, enabling permanent repair without full section replacement.
How do I know if my pipe repair is holding?
Restore water pressure gradually after completing the repair. Monitor the repair zone for 10-15 minutes under full operating pressure before closing up or leaving the area. Check for any seepage at the repair edges or along adjacent pipe sections. Any visible moisture indicates insufficient coverage or bond failure and must be re-addressed before returning the line to full service.