Introduction
Cast iron pipes have served homes and infrastructure for over a century, but when they start to fail, the signs are hard to miss—and the damage can escalate quickly if ignored. Slow drains, foul sewer odors, and unexplained wet spots along drain lines all signal that the clock is ticking. According to industry data, cast iron sewer lines in homes built before the 1970s are now reaching the end of their 50–100 year service life, meaning millions of residential and commercial properties face repair or replacement decisions today.
Cast iron pipe failures follow predictable patterns:
- Internal corrosion from hydrogen sulfide gas
- Joint degradation as rubber or lead caulking dries out
- Cracking from ground movement or soil shift
- Root intrusion through weakened seams
Catch the problem early and most failures are fixable. Apply the wrong repair method, though, and you're buying time rather than solving it.
This article covers the root causes of failure, warning signs to watch for, a step-by-step repair process, repair method comparisons (including newer polymer bonding approaches), and guidance on when replacement makes more sense than a patch.
Key Takeaways
- Cast iron pipes, typically found in homes built before the 1970s, are prone to internal corrosion, joint leaks, cracking, and root intrusion
- Warning signs include slow drains, foul odors, mold growth, discolored water, and lush patches above buried lines
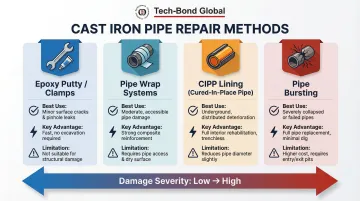
- Repair options range from epoxy putty for minor leaks to CIPP lining and pipe bursting for extensive damage
- Correct diagnosis matters: the wrong repair method lets the underlying problem continue to spread
- Get a professional inspection for anything beyond a small, accessible surface crack
Why Cast Iron Pipes Fail: Root Causes and Warning Signs
Cast iron pipes were the dominant material for drain and sewer lines until PVC became widespread in the 1970s. Millions of residential and commercial properties still rely on them today. While cast iron can last 50–100 years under ideal conditions, real-world conditions accelerate degradation.
Primary Root Causes of Failure
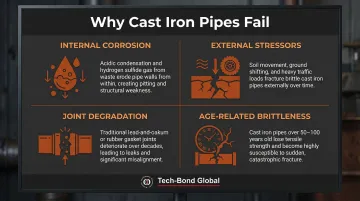
Four failure mechanisms account for the vast majority of cast iron pipe problems:
| Failure Mechanism | Root Cause | Process | Typical Risk Age |
|---|---|---|---|
| Internal corrosion | Hydrogen sulfide from organic waste | H2S + moisture forms sulfuric acid; erodes walls from within; chemical drain cleaners accelerate thinning | 40+ years |
| External stressors | Ground movement, roots, surface loads | Structural cracking, offset joints, or collapse - especially in already-weakened pipe | All ages; worse when corroded |
| Joint degradation | Lead-oakum or rubber coupling failure | Couplings dry out, crack, or loosen over time; leak points form even when pipe body is intact | 50-70+ years |
| Age-related brittleness | Loss of elasticity with age | Cracks from minor pressure changes or vibration | 70+ years |
Key Warning Signs
- Slow-draining fixtures across multiple points in the building indicate a main line issue, not a localized clog
- Foul sewer odors inside the home signal a crack or gap allowing gases to escape
- Mold or water staining near walls, floors, or basement ceilings adjacent to drain lines
- Discolored or rust-tinged water at fixtures served by cast iron supply lines
- Lush, unusually green patches of grass above buried sewer lines—a common indicator of slow underground leakage
How to Repair Cast Iron Pipes: Step by Step
Attempting a repair without first confirming the location and extent of damage leads to wasted materials, repeat failures, and potential safety hazards. The process below applies whether the repair will be DIY or professionally executed.
Step 1: Inspect and Confirm the Damage
For accessible pipes, conduct a visual inspection. Look for:
- Rust staining or white mineral deposits (efflorescence)
- Visible cracks or separated joints
- Wet spots or active dripping
- Corrosion pitting or thinning walls
Underground or concealed pipes require a professional sewer camera (CCTV) inspection. These inspections reveal:
- Exact crack location and length
- Root intrusion points
- Offset or separated joints
- Partial or full pipe collapse
- Internal corrosion severity
CCTV inspection method, recording video of the entire line to pinpoint problems without excavation.
Step 2: Clear and Prepare the Damaged Area
For accessible pipes, the repair surface must be cleaned thoroughly before any fix is applied. Use a wire brush or grinder to remove:
- Rust and scale
- Grease and organic residue
- Loose debris or flaking material
Critical: Moisture on the surface at application time is one of the most common reasons repair materials fail prematurely. Dry the area completely with a heat gun or allow it to air-dry.
For drain lines requiring internal lining, professional hydrojetting or mechanical cleaning is necessary before any coating can adhere properly. Host pipe prep requirements.
Step 3: Apply the Appropriate Repair Method
The right repair method depends on the damage type: surface crack, joint leak, section damage, or structural failure. Select based on severity and access.
Temporary/DIY methods for small, accessible surface cracks:
- Epoxy putty: Knead the two-part compound, apply over the crack, and allow to cure. Typically cures in 60–90 minutes.
- Pipe repair clamps: Metal clamps with rubber gaskets bolted around the damaged section to seal leaks mechanically.
These are short-term measures and not structural repairs.
Pipe wrap and patch systems for moderate localized damage:
Resin-impregnated wraps or PTFE-coated fabric wraps bond to the pipe surface, creating a reinforced sleeve over the damaged section. Performance varies significantly by system.
Tech-Bond's TPRS™ (Tech Patch Repair System) uses PTFE-coated E-glass fabric with a patented process that creates molecular-level cross-linking (forming chemical bonds rather than surface grip). This increases bond temperature limits by 30% or more compared to conventional adhesive-based systems. PTFE's chemical and fuel resistance also makes it durable in harsh environments where standard wraps degrade.
For above-ground or accessible sections with moderate damage, wrap systems are a practical alternative to full replacement — provided the pipe structure is still intact. When damage extends underground or affects longer pipe runs, trenchless methods become the more cost-effective path.
Professional trenchless options:
- CIPP (Cured-In-Place Pipe) lining: A resin-saturated liner is inserted into the existing pipe and cured in place, creating a smooth new pipe inside the old one. CIPP systems are commonly designed for 2-inch to 12-inch pipe diameters, covering typical residential sewer laterals. No excavation required.
- Pipe bursting: A new HDPE or PVC pipe is pulled through while the old cast iron pipe is fractured outward. Suitable for severely damaged or offset pipes.
Step 4: Test and Validate the Repair
After any repair, run water through the system and observe the repaired area for dripping, seeping, or joint movement. For underground repairs, a follow-up camera inspection or pressure test confirms the repair is holding.
Cure times before load:
- Epoxy putty: 60–90 minutes before minor flow; 24 hours for full cure
- Pipe wraps: Varies by system; some molecular bonding wraps cure in minutes with heat application
- CIPP liners: Ambient curing takes approximately 3 hours; steam curing as little as 20 minutes
For underground CIPP repairs, CIPP test pressure formula to confirm leak-tightness.
Choosing the Right Repair Method for Your Situation
Not every cast iron pipe problem requires the same fix. The most cost-effective outcome comes from matching the repair method to the damage type, location, accessibility, and long-term performance expectations.
| Repair Method | Best For | Approach | Pros | Cons |
|---|---|---|---|---|
| Epoxy putty / pipe clamps | Small, accessible surface cracks | Apply compound or clamp over crack | Inexpensive, fast, DIY-friendly | Temporary only; hides ongoing corrosion |
| Pipe wrap / patch systems | Moderate accessible damage above-ground | Resin-impregnated or PTFE-coated wrap applied over damage | No excavation; longer-lasting than putty | Depends on thorough surface prep |
| CIPP lining | Longer underground sections with distributed damage | Resin-saturated liner inserted and cured in place | No excavation; minimal disruption; rapid return to service | Cannot address collapsed or severely offset pipe |
| Pipe bursting | Severely damaged, offset, or collapsed pipe | Bursting head fractures old pipe while pulling in new HDPE/PVC | Full replacement in same trench | Requires excavation at access points |
| Full excavation / replacement | Widespread damage, multiple failures, end-of-life pipe | Complete removal and replacement; trenchless lining is lower-cost where structurally feasible | Permanent solution; fresh start | Most expensive; maximum site disruption |
Fix vs. Replace Cast Iron Pipes: Making the Right Call
The repair-vs-replace decision comes down to three factors: extent of damage, pipe age relative to expected remaining service life, and total cost of repair now versus cost of replacement later.
When Repair Makes Sense
- Isolated damage: Single crack, one failing joint, or localized corrosion
- Pipe age: Less than 60–70 years old
- Condition: Rest of the line shows acceptable condition on camera inspection
- Access: Allows effective repair without full excavation
When Replacement Makes More Sense
- Multiple failure points throughout the line
- Pipe age: 80+ years old with widespread corrosion or brittleness
- Previous repairs have failed or are failing
- Structural issues: Offset or collapse cannot be corrected by lining
- Cost threshold: Repair costs approach or exceed 50–60% of full replacement cost
Once repair costs cross that 50–60% threshold, replacement pays off over time. If walls, floors, or landscaping already need to be opened for another renovation, proactive PVC replacement is often the smarter move — avoiding a second disruption when the aging line eventually fails.
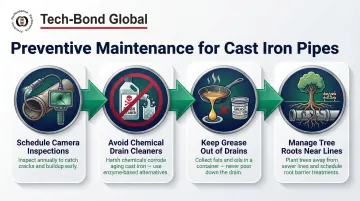
Preventive Maintenance to Extend Cast Iron Pipe Life
The best cast iron pipe repair is the one you never have to make. Routine maintenance significantly delays corrosion, joint failure, and root intrusion.
Key preventive actions:
- Camera inspections every 3–5 years are worth scheduling for homes over 40 years old with cast iron drain lines. Early detection of minor corrosion or root entry prevents major failures.
- Chemical drain cleaners accelerate internal corrosion in cast iron — stick to mechanical cleaning like snaking or hydrojetting instead.
- Cooking grease, fats, and oils solidify inside pipes over time, creating conditions that speed up both corrosion and blockage. Keep them out of your drains.
- Tree roots near sewer lines can be managed with barrier installation or periodic cutting before intrusion becomes a costly repair.
Frequently Asked Questions
Can you repair a cast iron pipe?
Yes, cast iron pipes can be repaired using several approaches, including epoxy patch compounds, pipe wrap systems using molecular bonding technology, and trenchless CIPP lining. The right method depends on the location and extent of the damage.
Can you sleeve a cast iron sewer pipe?
Yes. CIPP lining inserts a resin-saturated liner into the existing pipe and cures it in place, creating a new pipe within the old one. It's one of the most effective methods for underground cast iron sewer pipes with distributed damage.
How much does it cost to sleeve cast iron pipe?
CIPP lining costs vary by pipe diameter, access difficulty, and region. Industry averages range from $80–$250 per linear foot; always get multiple quotes and confirm the scope covers cleaning, lining, and post-installation testing.
What are the warning signs that cast iron pipes need repair?
The most actionable signs include persistent slow drains across multiple fixtures, sewer gas odors inside the building, mold or moisture near drain lines, discolored water, and lush green patches above buried sewer lines.
How long do cast iron pipes last?
Cast iron pipes can last 50–100 years depending on soil conditions, water chemistry, maintenance history, and installation quality. Pipes approaching or past 70 years old should receive a professional inspection regardless of symptoms.