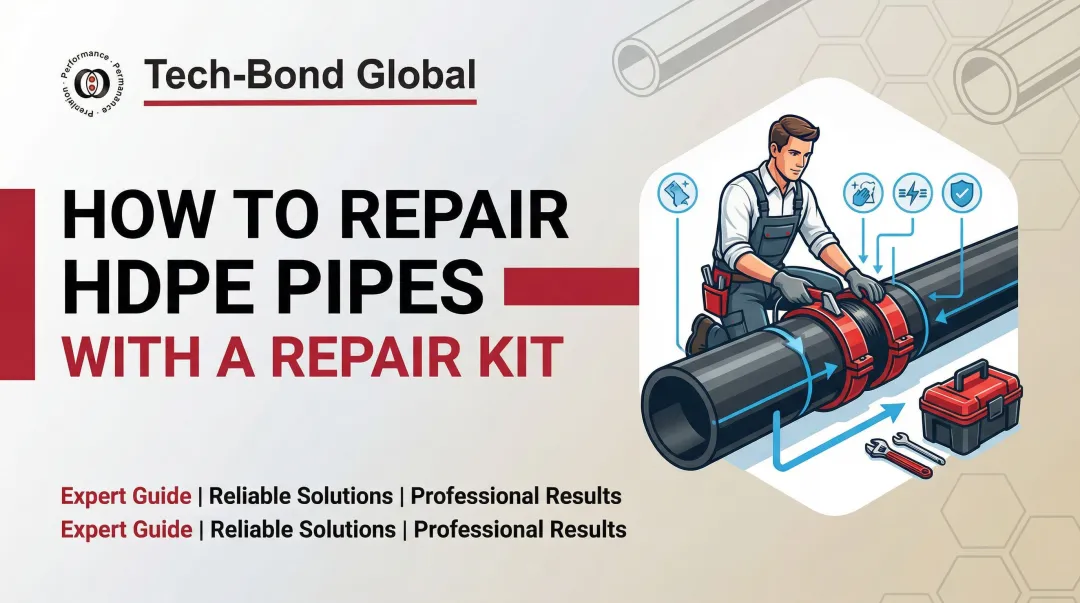
Introduction
When an HDPE pipe fails mid-operation — in a mine, a municipal water system, or an industrial facility — the cost isn't just the pipe. It's the downtime, the environmental exposure, and the scramble to find a repair method that actually works. HDPE (High-Density Polyethylene) has earned its place across these sectors through chemical resistance, flexibility, and durability. The global HDPE pipe market is projected to reach $37.93 billion by 2034, reflecting just how deeply embedded it is in critical infrastructure.
Yet HDPE does fail. Surface cracks, joint separations, impact damage, and chemical degradation all occur under real-world conditions.
The core repair challenge comes down to surface energy. HDPE's low surface energy — measured at just 31–32.1 mN/m — has historically made permanent repair difficult or impossible using standard adhesive methods.
This guide covers the most common HDPE pipe failure types, available repair methods (including emerging molecular bonding technology), a step-by-step repair process, and a clear framework for deciding when to repair versus replace.
Key Takeaways
- HDPE pipe is repairable when the method matches the damage type and operating environment
- Most failures fall into four categories: surface cracks, joint separations, impact punctures, and chemical degradation — each requiring a different repair approach
- Repair options range from mechanical clamps to thermal welding and molecular bonding patch systems
- Temporary clamp fixes work for emergencies; permanent repairs require welding or molecular bonding systems that bond at the material level — not just on the surface
- Replace the pipe when damage spans multiple points, wall integrity is compromised, or repair costs exceed 50–60% of replacement cost
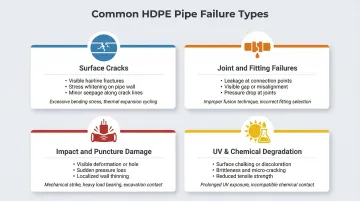
Common Problems With HDPE Pipe
HDPE pipe failures follow recognizable patterns. Knowing which failure type you're dealing with determines the right repair approach.
Surface Cracks and Hairline Fractures
Symptoms:
- Visible longitudinal or circumferential cracks
- Minor seepage or moisture around pipe exterior
- Gradual pressure loss
Likely causes: Stress concentration from ground movement, thermal expansion/contraction cycles, or improper installation such as over-bending or inadequate support. While modern PE4710 materials demonstrate exceptional resistance to slow crack growth (>500 hours PENT), improper installation still creates failure points.
Joint and Fitting Failures
Symptoms:
- Leaks at butt fusion or electrofusion joints
- Visible separation or bubbling at the weld zone
- Weeping around fitting connections
Likely causes: Improper fusion parameters during installation—incorrect temperature, pressure, or cool-down time. Failure to remove the thin outer oxidation layer prevents surfaces from heat fusing properly, creating the single most common cause of unsuccessful electrofusion joints.
Impact and Puncture Damage
Symptoms:
- Sudden visible holes, deformation, or gouges on the pipe wall
- Rapid pressure loss
- Physical damage visible on pipe exterior
Likely causes: Mechanical impact from equipment, falling debris in mining environments, or excavation accidents. Third-party mechanical damage represents one of the most common causes of PE pipe failure in the field.
UV and Chemical Degradation
Symptoms:
- Surface chalking and brittleness
- Discoloration on exposed pipe runs
- Micro-cracking visible on the surface
Likely causes: Prolonged UV exposure without protective coating, or contact with incompatible chemicals causing surface embrittlement. Unprotected HDPE exposed to UV undergoes photo-oxidation, leading to rapid tensile strength loss.
Modern HDPE formulations require 2–3% carbon black dispersion to achieve 50+ years of outdoor protection.
Large-Section or Multi-Point Damage
When multiple failure sites appear along a single run—combined with significant wall thinning or structural deformation across a longer segment—you're typically dealing with long-term stress accumulation, aggressive soil conditions, or a pipe grade that was under-specified for the application. When damage exceeds 10% of minimum wall thickness, the section needs replacement rather than repair.
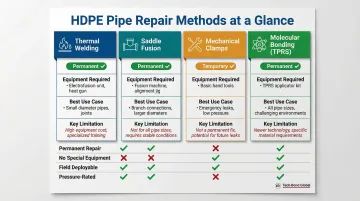
HDPE Pipe Repair Methods Explained
Choosing the wrong repair method is one of the most costly mistakes operators make. Each method has a specific application range, and using a temporary fix where a permanent one is needed leads to repeat failures and escalating costs.
Thermal Welding (Butt Fusion and Electrofusion)
Butt fusion and electrofusion represent industry-standard permanent joint repair methods:
- Butt fusion: Heat plate fusion of pipe ends, creating a homogeneous bond
- Electrofusion: Electrically heated fittings that fuse to the pipe wall
Both methods require pipe isolation, specialized equipment, and trained operators following ASTM F2620 or ISO 21307 procedures. Best suited for joint-area repairs and short pipe section replacements where complete fusion can be achieved under controlled conditions.
Saddle Fusion
Saddle fusion allows for tapping or repairing localized sections of pipe wall without full cut-out. It works effectively for:
- Adding branch connections
- Repairing small damaged zones on larger-diameter pipe
- Situations where cutting out the pipe section is impractical
Requires compatible saddle fittings and a fusion machine. The process creates a permanent molecular bond but demands precise temperature control and surface preparation.
Mechanical Repair Clamps and Couplings
Mechanical clamps and split repair couplings provide fast, equipment-light solutions for emergency containment:
Advantages:
- Rapid field deployment without special equipment
- No hot work or fusion equipment required
- Immediate leak containment
Limitations:
- Typically rated as temporary or semi-permanent
- Pressure-limited (though some large-diameter sleeves can handle high working pressures)
- Require internal pipe stiffeners to prevent "necking down"
- Do not prevent lateral movement without proper anchorage
Best for rapid field response while permanent repairs are planned.
Traditional Epoxy and Fiberglass Wrap Systems
Epoxy-based composite wraps have been used to reinforce and seal damaged pipe sections, particularly in the pipeline industry. However, they face a significant limitation with HDPE:
Standard epoxies and fiberglass wraps fail to bond adequately to HDPE's non-polar surface, often delaminating under pressure or thermal cycling. Two factors drive this failure:
- HDPE's non-polar chemistry resists conventional adhesive bonding
- Without plasma treatment, chemical modification, or specialized primers, epoxy adhesion to untreated HDPE is negligible
Molecular Bonding Patch Systems (TPRS)
Molecular bonding patch systems solve the core limitation of HDPE repair: the polymer's non-polar surface resists adhesion from conventional wraps and epoxies. The Tech Patch Repair System (TPRS) by Tech-Bond Global bonds PTFE-coated E-glass fabric to the HDPE surface at the molecular level rather than relying on adhesives.
Unlike standard wraps, TPRS creates crosslinks at the surface that produce bonds at or exceeding the strength of the original pipe material. In spring 2023, the system was field-validated on a 78-inch HDPE pipe for Borouge in Abu Dhabi — one of the largest HDPE pipe repairs on record.
Key advantages:
- Field-deployable without special equipment
- Viable in remote mining, energy, and infrastructure settings
- Works on HDPE's low-surface-energy chemistry
- Requires minimal operational shutdown
- Creates permanent, pressure-rated repairs
This makes TPRS a practical alternative when fusion welding isn't feasible and mechanical clamps won't hold — particularly in remote or high-pressure environments where a repeat repair isn't an option.
Step-by-Step HDPE Pipe Repair Process
Executing a repair correctly requires methodical preparation. Rushing the assessment or skipping surface prep are the two most common causes of repair failure regardless of method used.
Step 1: Assess and Document the Damage
Inspection requirements:
- Measure crack length and wall depth
- Check proximity to joints or fittings
- Identify signs of secondary damage
- Document with photos
Operating parameters to verify:
- Current operating pressure
- Pipe grade and SDR (Standard Dimension Ratio) rating
- Fluid type and chemical compatibility
- Temperature exposure range
Each parameter directly influences which repair method is viable and what materials are compatible.
Step 2: Isolate the Line and Control the Environment
Isolation protocol:
- Depressurize the affected pipe section
- Drain where possible
- Verify the repair area is clean and dry
- Remove all hydrocarbon or chemical residue
Surface contamination is the leading cause of bond failure across all repair methods. Never attempt repairs on pressurized or contaminated lines.
Step 3: Prepare the Pipe Surface
Once the line is isolated and dry, surface preparation determines whether the repair holds long-term. For all methods, start with:
- Clean with appropriate solvent (typically 90%+ isopropyl alcohol)
- Remove surface oxidation and chalking if present
- Roughen the repair zone
For electrofusion specifically: Remove minimum 0.007 inches of oxidized surface layer using a mechanical peeling tool to expose clean, virgin material.
For molecular bonding systems: Surface activation is the critical preparatory step. Follow the specific preparation protocol to ensure crosslinking occurs correctly—typically involving surface-modifying agents that change the surface energy profile.
Step 4: Apply the Repair Method
Execute according to the selected method:
Welding:
- Verify fusion parameters match pipe grade and ambient temperature
- Monitor heating time, pressure, and cool-down cycles
- Inspect bead formation for size, shape, and alignment
Mechanical clamps:
- Torque bolts to manufacturer specification
- Install internal stiffeners where required
- Verify gasket seating and uniform compression
Patch systems:
- Apply layers in specified direction and overlap pattern
- Ensure uniform coverage
- Eliminate air pockets through proper roller technique
Note: Molecular bonding patch systems, such as Tech-Bond Global's TPRS, are designed for field deployment and do not require shutting down adjacent infrastructure during application.
Step 5: Test and Validate the Repair
Re-pressurization protocol:
- Gradually increase pressure while monitoring repair zone
- Check for seepage, movement, or deformation
- For critical applications, conduct hydrostatic pressure test
ASTM F2164 hydrostatic testing typically requires pressurizing to 1.5 times rated working pressure. Due to HDPE's viscoelastic expansion (its tendency to expand slightly under pressure before stabilizing), an initial expansion phase with makeup water is required, followed by a test phase (maximum 3 hours) where pressure must remain within 5% of target.
Document the repair method, date, and test results. A complete record supports regulatory compliance and makes future inspections faster and more accurate.

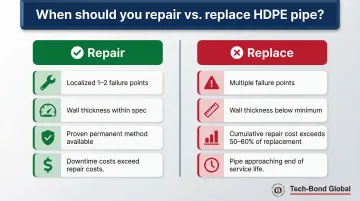
Repair vs. Replace: How to Decide
The repair vs. replace decision is primarily driven by three factors: extent of structural compromise, remaining service life of the pipe, and true cost of each option including downtime.
Repair When...
Damage is localized and manageable:
- One or two isolated failure points
- Pipe wall thickness is within serviceable range
- Pipe grade and pressure rating are still appropriate for the application
- A proven permanent repair method (not a temporary clamp) can be applied
Historical data shows HDPE distribution system repairs range from $1,000 to $7,000 per incident, requiring 5 to 7.5 hours depending on pipe size and excavation depth. Pipe section replacement, by contrast, typically runs $150–$300 per linear foot for large-diameter industrial HDPE — before factoring in excavation, downtime, or service interruption.
Repair is economically favorable when:
- Damage is limited to 1-2 feet of pipe length
- Operating pressure can be temporarily reduced during repair
- The repair method provides a permanent, pressure-rated solution
- Downtime costs significantly exceed repair costs
When those conditions aren't met, replacement is the more reliable path forward.
Replace When...
Structural integrity is compromised:
- Damage spans multiple points along a run
- Wall thickness is below minimum specification (any damage exceeding 10% of minimum wall thickness requires replacement)
- Pipe has visible structural deformation
- Repeated failures suggest installed pipe grade is insufficient
Life cycle considerations:
- Pipe is approaching end of rated service life (50-100 years for HDPE pipe)
- Cumulative repair costs approach 50-60% of replacement cost
- Operating conditions have changed since original installation
- Trenchless replacement methods are available that minimize disruption
Common Mistakes and Preventive Best Practices
Most HDPE pipe repair failures are not caused by the wrong method being chosen—they are caused by avoidable execution errors during preparation and application.
Common Mistakes to Avoid
Surface preparation failures:
- Skipping surface activation before applying bonding systems (leading cause of delamination)
- Using standard epoxy or fiberglass wrap products not formulated for HDPE's low-surface-energy chemistry
- Incomplete removal of oxidation layer for electrofusion joints
Application errors:
- Applying repairs to pressurized or contaminated lines
- Returning line to full operating pressure before repair has fully cured
- Insufficient fusion time or incorrect temperature parameters
- Inadequate torque on mechanical clamp bolts
Planning oversights:
- Choosing temporary solutions where permanent repairs are needed
- Attempting repairs beyond the damage threshold (>10% wall thickness)
- Failing to verify chemical compatibility of repair materials with transported fluids
Most of these failures are preventable. The practices below address the root causes directly.
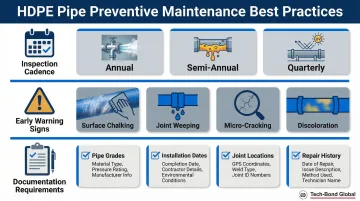
Preventive Maintenance Practices
Establish a scheduled inspection cadence:
Based on AWWA and ASTM guidelines, set inspection schedules based on:
- Operating pressure: High-pressure lines (>100 psi) require annual inspection
- Fluid type: Corrosive or abrasive fluids require semi-annual inspection
- Environmental exposure: Exposed or above-ground pipe requires quarterly UV degradation checks
Train teams to identify early-stage failures:
- Surface chalking (UV photo-oxidation indicator)
- Joint weeping (fusion quality indicator)
- Micro-cracking (stress concentration indicator)
- Discoloration patterns — often the first visible sign of chemical attack
Maintain comprehensive documentation:
- Pipe grades and SDR ratings
- Installation dates and fusion records
- Joint locations and types
- Prior repair history and methods used
Good records also surface patterns — a cluster of joint failures in one zone often signals a process problem, not just isolated damage.
Frequently Asked Questions
Frequently Asked Questions
Can you repair an HDPE pipe?
Yes, HDPE pipe can be repaired, but the method must match the damage type. Options range from mechanical clamps for emergency containment to thermal welding and molecular bonding systems for permanent industrial-grade repairs. The key is choosing a method compatible with HDPE's low surface energy.
Can HDPE plastic be welded?
HDPE can be thermally welded using butt fusion and electrofusion methods, which melt the material to form a fused joint. Welding requires proper equipment, trained operators following ASTM F2620 standards, and clean, dry conditions — including complete removal of the oxidation layer — to achieve a reliable bond.
What is the most effective method for repairing HDPE pipe?
The most effective method depends on damage type. Welding remains the standard for joint repairs and complete section replacement. Systems like Tech-Bond Global's Tech Patch Repair System (TPRS) offer field-deployable permanent solutions particularly effective for large-diameter pipe and remote locations where welding equipment is impractical or operational shutdown is costly.
How long does an HDPE pipe repair last?
A properly executed repair using welding or a molecular bonding system can be permanent and match or exceed original pipe strength. Mechanical clamps and temporary patches should be treated as interim solutions and replaced within a defined timeframe — typically 6-12 months depending on operating conditions and pressure requirements.
Can HDPE pipe be repaired without shutting down operations?
Patch wrap and molecular bonding systems can often be applied with minimal or no operational shutdown, especially at reduced pressure. Welding typically requires full line isolation and depressurization. The ability to repair under pressure depends on damage severity, operating pressure, and repair method specifications.
What causes HDPE pipe to crack or fail?
Main causes include thermal expansion stress, improper installation, mechanical impact, UV degradation, and exceeding rated pressure or chemical compatibility limits. Joint failures most often trace back to inadequate surface preparation during installation; material failures are rare in modern PE4710 formulations.