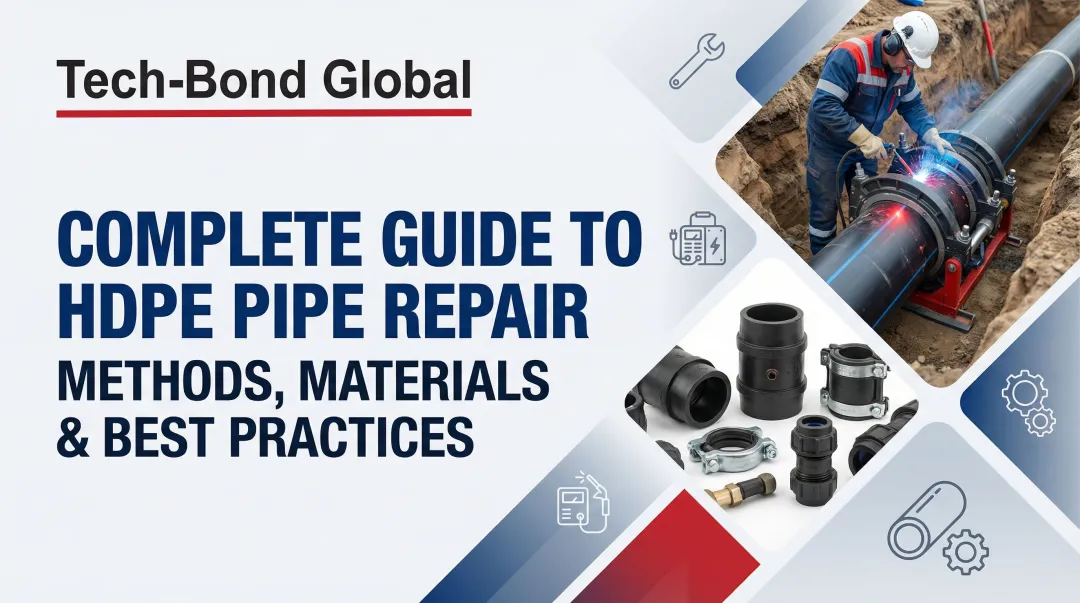
Unaddressed leaks don't just waste water—they trigger system downtime, accelerate surrounding damage, and often lead to costly full-pipe replacements that could have been avoided. This guide walks through how to identify the type and cause of a polyethylene pipe leak, the step-by-step repair process for different scenarios, how to choose the right repair method for your application, and when replacement actually makes more sense than repair.
Key Takeaways
- Leaks most often start at joints, fittings, or cracked wall sections caused by UV exposure, impact, or root intrusion
- Most small to mid-size leaks can be repaired without replacing the entire pipe run — if caught early
- Repair options range from barbed coupling swaps for residential lines to molecular bonding patch systems for large-diameter industrial HDPE pipe
- Ignoring a leak accelerates material degradation, increases water loss, and raises the risk of full pipe failure under pressure
- Replace the pipe when systemic cracking is present or repair costs exceed replacement value
What Is Polyethylene Pipe and Why Does It Leak?
Polyethylene pipe (PE pipe) is a flexible thermoplastic pipe made from high-density or low-density polyethylene resin. It's used in applications ranging from ¾-inch residential water lines and irrigation systems to large-diameter HDPE pipelines exceeding 78 inches in industrial settings such as mining slurry transport, municipal water distribution, and oil and gas.
Service Life and Market Adoption
The polyethylene pipe industry projects a 100-year service life for properly designed and installed systems. PE4710, a high-performance grade, is projected to exceed 100 years of resistance to chlorine and chloramine disinfectants in potable water systems. PE pipe now holds a 95% market share in new natural gas distribution piping in North America and a 65% share of the European water market.
Why PE Pipe Still Fails
Polyethylene's flexibility, chemical resistance, and corrosion immunity make it durable — but failures do occur. The main causes include:
| Failure Cause | Mechanism | Context | Prevention |
|---|---|---|---|
| Mechanical stress / ground movement | Crushing or cracking of pipe wall | Buried installations near construction or heavy loads | Proper bedding and backfill; restrict surface loads |
| Joint / fitting failure | Improper installation or clamp loosening | Any installation | Follow torque specs; inspect periodically |
| UV degradation | Embrittlement of exposed sections | Above-ground pipe without protection | Use ASTM D2513 Code C (2-3% carbon black; 10+ yr UV stability) |
| Pressure surge / water hammer | Exceeds rated pressure class | High-pressure or hydraulically dynamic systems | Install pressure regulators; limit surge to 2.0x PC |
| Tree root intrusion | Roots penetrate through joints or cracks | Buried pipe in rooted soil | Install root barriers; manage vegetation |
| Chemical attack / permeation | Incompatible fluid contact | Industrial systems with aggressive media | Verify chemical compatibility before installation |
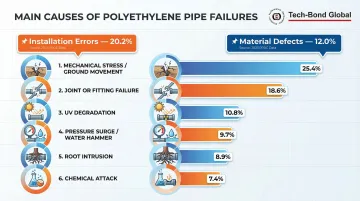
According to PPDC 2023 data representing over 818,000 miles of PE gas main, installation errors account for 20.2% of all documented PE pipeline failures, with material defects contributing another 12.0%.
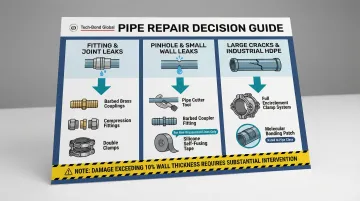
Common Types of Polyethylene Pipe Leaks
Identifying the leak type correctly is what determines which repair approach will actually hold — get it wrong, and you're back to square one.
Fitting and Joint Leaks
Signs to look for:
- Water seeping or spraying from connection points (barbed fittings, compression couplings, threaded adapters) rather than the pipe body
- Fittings appear displaced or hose clamps visibly corroded or loose
These failures typically trace back to:
- Improper installation torque on clamps
- Wrong fitting material or size
- Pressure cycling that loosened the joint over time
- Material incompatibility between the fitting and PE pipe
Pinhole or Small Wall Leaks
Signs to look for:
- Small but persistent moisture or damp soil in a localized spot
- Reduced flow pressure with no visible joint failure
- May be hard to locate without pressurizing the line
These failures typically trace back to:
- Puncture from rocks or sharp objects in backfill
- Pest or rodent damage
- Micro-crack that propagated from a stress concentration point — bends, kinks, or installation nicks
Longitudinal Cracks or Splits
Signs to look for:
- Visible linear cracking along the pipe surface
- Sudden pressure loss
- More common in older pipes or those exposed to UV
These failures typically trace back to:
- UV embrittlement in above-ground or partially exposed installations
- Thermal expansion/contraction cycling
- Pressure surge (water hammer) exceeding pipe rating — PE pipe tolerates 2.0x Pressure Class for occasional surges, 1.5x for recurring surges
Large-Diameter or Industrial Pipe Failures
Signs to look for:
- Visible cracks, fractures, or seeping along the pipe body in large (6-inch+) HDPE installations
- Performance loss in the system
- Pooling or wet zones near buried runs
These failures typically trace back to:
- Extreme operational pressure or surge events
- Abrasion from slurry or particulate flow internally
- Ground settlement or poor bedding/backfill during installation
- Weld seam failure at fusion joints
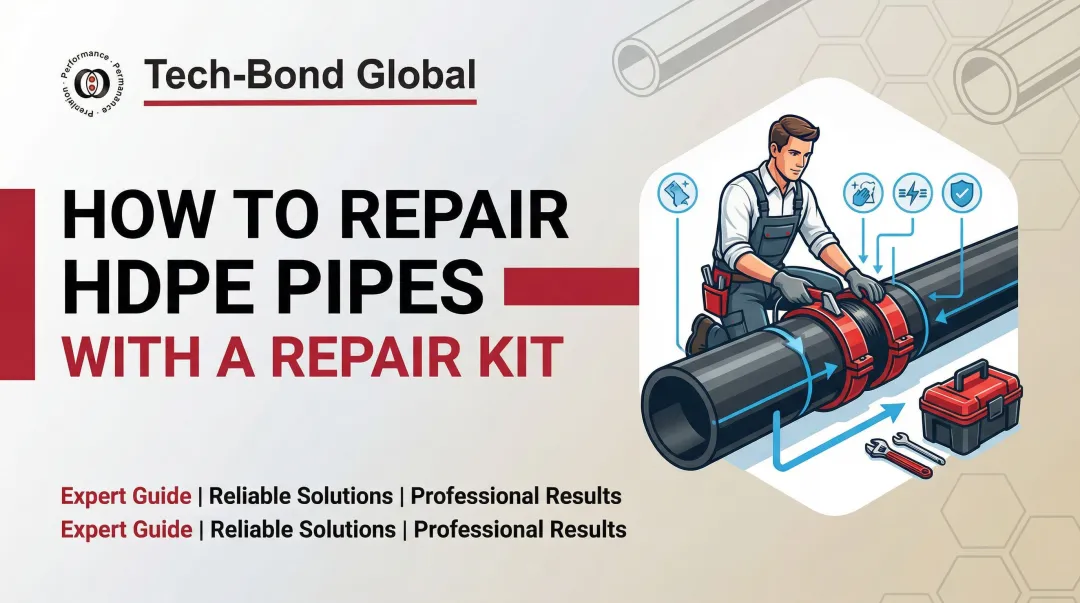
How to Repair a Polyethylene Pipe Leak: Step-by-Step
Attempting a repair without first isolating the leak type and confirming damage extent leads to failed repairs, reoccurrence, and safety hazards on pressurized systems. Always diagnose before you act.
Step 1: Isolate the System and Locate the Leak
Shut off flow to the affected section. On buried pipe, note where surface moisture, sinkholes, or wet spots appear— the visible wet area is often not directly above the leak, particularly if water is tracking along underground cavities or gopher runs.
Before any excavation:
- Restore pressure briefly (if safe) to pinpoint the exact failure point
- Call 811 (U.S.) or the relevant utility marking service before digging—federal regulations (49 CFR 192.614 and 195.442) require operators to mark buried pipelines before excavation begins
Step 2: Excavate and Expose the Damaged Section
Dig carefully to expose at least 12–18 inches of pipe on each side of the suspected damage zone. Switch to a hand trenching shovel near the pipe to avoid additional damage.
Key actions:
- Expose the full circumference of the pipe, not just the top
- Remove rocks, roots, or debris in the trench that contributed to the failure
Step 3: Assess the Damage and Select Your Repair Method
Inspect the exposed section: Is the damage confined to a fitting/joint, a pinhole or small crack, or a larger split/fracture?
Critical checks:
- Measure pipe diameter
- Check pipe grade markings (SDR rating, pressure class)
- Ensure replacement fittings or patch materials are compatible
- The repair method selected in Step 4 must match the damage type—using a barbed coupling on a split section will fail under pressure
Step 4: Execute the Repair Based on Damage Type
For fitting/joint leaks:
- Remove old clamps and fittings
- Replace with correctly sized barbed brass couplings or compression fittings (ASTM D2609 covers plastic insert fittings; ASTM F1924 covers mechanical fittings)
- Insert fitting fully, position hose clamps over the barbed section, and tighten firmly
- Use a second clamp per joint for added security
- On potable water lines, confirm local code requirements for fitting material (brass is typically required)
For pinhole or small wall leaks on smaller-diameter pipe:
- Cut out a clean section of 2–3 inches around the damage using a pipe cutter (not a saw, to avoid debris)
- Insert a barbed coupling or compression coupler
- Secure clamps
- For minor surface damage on non-pressurized irrigation lines, self-fusing silicone repair tape can work as a temporary measure
For large cracks, splits, or industrial HDPE pipe damage:
Standard barbed fittings are not rated for this scenario. According to ASTM standards and industry guidelines, damage exceeding 10% of the minimum wall thickness requires a more substantial intervention:
- Remove the damaged section entirely, or reinforce it with a full encirclement repair system
- Use pipe patch repair systems specifically rated for HDPE — standard mechanical fittings will not hold under pressure
- Verify the repair system's pressure rating matches the pipeline's operating class before installation
Step 5: Test the Repair Under Pressure
Restore flow gradually and monitor the repaired section at operating pressure for a minimum of 15–30 minutes before backfilling.
What to check:
- Seepage at fitting interfaces
- Clamp positions
- Pipe body around the repair
- If any weeping is observed, do not backfill—re-tighten or redo the connection
- Document the test result
Step 6: Backfill and Monitor
Backfill in layers, tamping gently around the pipe without placing heavy rocks directly against it. Avoid disturbing the repaired joint during backfill.
Post-repair monitoring:
- Watch the area over the following days and weeks for re-emergence of moisture or pressure drop in the system
Choosing the Right Repair Method for Your Pipe
The right repair method depends on pipe size, pressure rating, and application context. A residential irrigation fix is a completely different problem from a pressurized 12-inch or 78-inch HDPE industrial pipeline. Choosing the wrong method creates a repair that looks complete but fails under load.
Barbed and Compression Fittings (Residential/Light Commercial)
Best for: Residential and light commercial poly pipe up to 2 inches in diameter
Advantages:
- Widely available and low-cost
- Adequate for low-to-medium pressure water lines and irrigation
Limitations:
- Pressure rating constraints
- Unsuitable for split-wall or fractured pipe body
Fusion Repair (Industrial HDPE)
Best for: Larger HDPE pipe runs where permanent joints are required
Butt fusion (ASTM F2620) and electrofusion (ASTM F1290) produce strong joints by melting and fusing PE pipe ends together.
Limitations:
- Requires specialized equipment and trained operators
- Requires pipe sections to be cut out
- Not practical in remote or confined environments
- Requires dry conditions
Mechanical Repair Sleeves (Temporary Only)
According to Performance Pipe Field Handbook guidelines, mechanical repair sleeves are wrap-around sheet metal sleeves with bolted seams and elastomeric gaskets.
Critical limitations:
- Do not provide thrust restraint
- Should not be used to join pressure pipe
- Should never be used to repair a leak at a fusion joint
- Strictly temporary or emergency measures
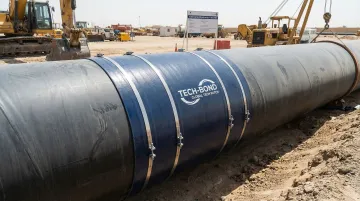
Molecular Bonding Patch Systems (Permanent Industrial Repair)
For large-diameter and high-pressure HDPE industrial pipe (slurry pipelines in mining, water mains in municipal systems, industrial process lines), conventional methods fall short. Neither mechanical sleeves nor fusion is practical in every field scenario.
Tech-Bond Global's Tech Patch Repair System (TPRS) addresses this gap using a patented molecular bonding process that crosslinks directly to the polyethylene surface rather than gluing to it. The result is a permanent bond stronger than the original pipe material. In spring 2023, Tech-Bond Global repaired a 78-inch HDPE pipe for Borouge in Abu Dhabi, demonstrating the system's effectiveness at extreme industrial scale.
Independent testing by the Borouge Innovation Center (BIC) under ISO 1167 and ISO 13479 confirmed the performance: 4-inch SDR 11 HDPE pipe (rated ~350 psi) repaired with TPRS withstood 1,800 psi for over 100 hours without patch failure — more than five times the pipe's original design rating.
| Repair Method | Permanence | Thrust Restraint | Primary Application |
|---|---|---|---|
| Barbed/Compression Fittings | Long-term | No | Residential ≤2" |
| Butt/Electrofusion | Permanent | Yes | Industrial, requires equipment |
| Mechanical Sleeves | Temporary | No | Emergency only |
| Molecular Bonding Patches | Permanent | Yes | Industrial HDPE, all sizes |
Fix vs. Replace, and How to Avoid Repeat Leaks
Repair vs. Replace: How to Decide
Repair is the right call when:
- Damage is localized (one fitting, one crack section)
- Surrounding pipe is in good structural condition
- Pipe is within its rated service life
- A compatible repair method exists for the pipe size and pressure class
For industrial pipe, a permanent repair system can restore or exceed original performance while avoiding full-section replacement costs. The US and Canada experience approximately annual water main break costs in maintenance and repair costs.
Replace when:
- Widespread cracking, brittleness, or UV embrittlement spans a long run
- The pipe has exceeded its pressure rating design life
- Repeated repairs to the same section have failed
- The original installation was non-compliant and poses ongoing risk
- Surface damage exceeds 10% of minimum wall thickness and cannot be reinforced
Preventing Future Leaks
Once you've resolved the immediate failure, the goal shifts to keeping it from happening again. Most repeat leaks are preventable with consistent monitoring and a few targeted precautions.
A few proactive steps can prevent most repeat failures:
- Schedule regular visual inspections on exposed poly pipe and pressure monitoring on buried systems
- After any ground movement (construction, frost heave, seismic activity), inspect the full run
- Ensure backfill material is free of sharp rocks
- Install UV-rated protective conduit on any above-grade polyethylene sections
- Train maintenance staff to recognize early-stage symptoms (soft soil, pressure fluctuations, discoloration at fittings) before they escalate to full breaks
Frequently Asked Questions
Can you repair polyethylene pipe without cutting it?
Minor surface leaks on non-pressurized small-diameter pipe can sometimes be addressed with wrap-type or clamp-over repairs without cutting. However, for any fitting leak, split, or pressurized line, cutting out the damaged section and installing a proper coupling or patch is the only reliable approach.
How long does a polyethylene pipe repair last?
The method determines the lifespan. Barbed fitting repairs last many years when properly clamped; molecular bonding systems like TPRS are designed to be permanent, producing bonds stronger than the original pipe. Tape and wrap repairs are not rated for long-term pressurized use.
Can you use regular epoxy or adhesive to repair polyethylene pipe?
No. Standard adhesives and epoxies do not bond to polyethylene because it is a non-polar, low-surface-energy polymer with a critical surface tension of approximately 31 mN/m. Standard gluing fails immediately under pressure. This is why mechanical fittings or molecular bonding systems are required for PE pipe.
How do you find a leak in a buried polyethylene pipe?
Look for wet soil patches or sinkholes above the pipe run, then temporarily restore pressure and trace the line. Keep in mind that visible wet spots may be displaced from the actual leak if water tracks through underground cavities. For large systems, professional acoustic correlation or tracer gas detection is available.
What size fittings do I need to repair black poly pipe?
Fitting size must match the pipe's outer diameter exactly. Common residential poly pipe ranges from ¾ inch to 2 inches. Always check the pipe marking for SDR rating and pressure class before selecting replacement fittings to ensure pressure compatibility.
When is a polyethylene pipe leak a sign of a bigger system problem?
Repeated leaks at multiple points, widespread cracking, or untraceable pressure drops suggest systemic degradation from UV embrittlement, soil chemistry, or end-of-service-life failure. At that point, a full system assessment is the right call rather than spot repairs.