Introduction
When an HDPE pipe fails in a mining slurry line or municipal water system, the default response is often full replacement — excavation, bypass pumping, days of downtime, and significant cost. In many cases, that's unnecessary. The global HDPE pipe market reached $24.44 billion in 2025 and is projected to grow to $37.93 billion by 2034, driven by infrastructure investment in water supply, wastewater, and industrial systems. HDPE dominates these applications because it outperforms steel and concrete on weight, chemical resistance, and flexibility — but that doesn't make it immune to damage.
Despite its toughness, HDPE fails. Impact from dropped equipment or rock strikes, pressure surges from water hammer, thermal expansion cycles, UV degradation, and improper installation all create cracks, splits, and leaks that compromise system integrity.
The problem is that most facilities default to replacement when a field repair is actually viable — and far cheaper.
This guide covers how to assess HDPE pipe damage, use a repair kit correctly, and execute a repair step by step. You'll also learn why standard adhesives fail on HDPE, what molecular bonding systems do differently, and when replacement is the only real option.
Key Takeaways
- Field repair of HDPE pipes is viable — no full replacement or system shutdown required when you use a repair kit designed for polyolefin bonding
- Common failure causes include impact, pressure surges, thermal stress, UV exposure, and installation errors
- Surface prep, HDPE-specific patch materials, and correct application technique directly determine whether the repair holds under pressure
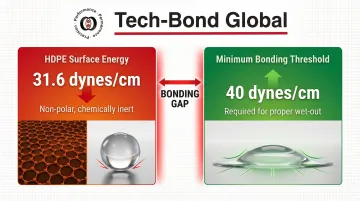
- Standard adhesives, epoxies, and fiberglass wraps fail on HDPE due to its low surface energy (approximately 31.6 dynes/cm)
- When damage exceeds 10% of wall thickness, affects fused joints, or spans multiple failure points, replacement is the safer call
What Is an HDPE Pipe Repair Kit?
An HDPE pipe repair kit is a system deployable in the field that contains the materials needed to seal cracks, holes, or surface damage without pipe replacement. Typical kits include a patch or wrap material, a surface activator or primer, and application tools. These kits allow technicians to restore pressure integrity on-site, eliminating the need for cutting out damaged sections and installing fused replacement pieces. Not all repair kits are built for HDPE, though. The material's chemistry is precisely why most standard options fall short.
Why Standard Adhesives Fail on HDPE
The primary reason standard adhesives and epoxies fail on HDPE is the material's extremely low surface energy. Research establishes the critical surface tension of polyethylene at approximately 31 to 31.6 dynes/cm. For an adhesive to properly "wet out" and bond to a substrate, the substrate's surface energy typically needs to be 40 dynes/cm or higher. Because untreated HDPE is a non-polar hydrocarbon, it actively resists bonding—causing standard glues and epoxies to bead up rather than adhere.
Key reasons conventional methods fail:
| Failure Reason | Mechanism | Effect |
|---|---|---|
| No reactive bonding sites | HDPE's chemically inert molecular structure | Adhesive cannot form chemical bonds with the substrate |
| Surface energy too low | Surface energy falls well below the 40 dynes/cm threshold | Adhesive beads up instead of wetting the surface |
| Thermal expansion mismatch | Rigid epoxy cannot flex with the pipe | Epoxy bonds crack as pipe expands and contracts with temperature changes |
| Non-porous, smooth surface | No surface texture for mechanical interlocking | Adhesive has no physical anchor points |
Even products marketed as "universal" pipe repair kits often fail on HDPE because they lack the specific chemical primers required to alter polyolefin surface energy.
Purpose-Built HDPE Repair Systems
Advanced repair systems designed specifically for HDPE overcome these challenges through molecular bonding technology. Tech-Bond Global's Tech Patch Repair System (TPRS) takes this approach further with a patented molecular bonding process combined with PTFE-coated E-glass fabric—a material that outperforms traditional fiberglass in chemical, mechanical, and physical resistance.
The system works by modifying the HDPE surface at the molecular level, creating crosslinks that bond the patch material directly to the substrate rather than relying on surface adhesion. In a 2023 field application for Borouge in Abu Dhabi, this approach successfully repaired cracks in a 78-inch HDPE pipe—a scale and pressure environment where conventional adhesive repairs would not hold.
Common Causes of HDPE Pipe Damage
Most HDPE pipe failures follow predictable patterns. Early identification of the cause determines whether a repair kit is the right solution or whether an underlying operational issue needs attention first.
Impact and Mechanical Damage
Cracks or punctures from dropped equipment, rock strikes (common in mining), or vehicle contact are typically localized and well-suited for repair kit use. These failures create clean damage boundaries that can be isolated and patched effectively.
Pressure Surge and Water Hammer
Sudden pressure spikes caused by rapid valve closures or pump failures create longitudinal splits or circumferential cracking, particularly near fittings and bends. While HDPE's flexibility makes it resilient to surge pressures compared to rigid pipes, severe transients exceeding 2.0 times the pipe's Pressure Class (PC) can still cause damage. Before patching, confirm whether the damaged section still falls within the pipe's rated specification.
Thermal Expansion and UV Degradation
HDPE has a high coefficient of thermal expansion—approximately 8.0 × 10⁻⁵ in/in/°F, roughly ten times that of metal or concrete. Repeated heating and cooling cycles cause micro-cracking over time, while UV exposure without protective coating leads to surface brittleness.
Key specs to know when evaluating thermal or UV-related damage:
- Unrestrained HDPE changes length by 1 inch per 10°F temperature swing per 100 feet of pipe
- Black HDPE with ≥2% carbon black provides indefinite photo-oxidation resistance
- Colored HDPE relies on sacrificial UV stabilizers and should not remain in unprotected outdoor storage beyond 2 years before surface embrittlement becomes a risk
Improper Installation or Joint Failure
Leaks at butt-fused or electrofused joints, or damage from over-bending during installation, represent a different repair challenge than mid-pipe damage. Joint repairs often require different techniques or full replacement rather than patch-based field repair kits.
How to Repair HDPE Pipes with a Repair Kit
Attempting to repair HDPE pipe without correctly identifying the damage type, preparing the surface, and using a kit designed specifically for HDPE will result in failure—either immediately or under the first pressure cycle.
Step 1: Assess and Isolate the Damage
Shut down flow and depressurize the line completely. Inspect the damage both visually and by feel, noting:
- Crack length and orientation (longitudinal vs. circumferential)
- Depth (surface vs. through-wall)
- Proximity to fittings, joints, or bends
Mark the repair boundary at least 2 inches beyond the visible damage on each side.
Determine if the damage is repairable:
- Suitable for kit repair: Through-wall cracks under a defined length, surface erosion, impact punctures, damage affecting less than one-third of pipe circumference
- Requires replacement: Damage spanning more than one-third of circumference, at fused joints, involving pipe deformation, or exceeding 10% of minimum wall thickness
Step 2: Prepare the Pipe Surface
Surface preparation is the most critical step. Any contamination or inadequate prep will prevent bonding.
Clean the repair area thoroughly:
- Remove dirt, oil, grease, and any oxidized or degraded HDPE surface layer
- Use a solvent wipe appropriate for polyolefins
- Ensure complete removal of all contamination
Once clean, abrade the surface before applying any chemistry:
- Use 80-grit sandpaper or mechanical grinder
- Create micro-texture within the marked repair zone
- Remove the surface "sheen" to expose virgin polymer
- Wipe clean again after abrading
This mechanical prep is critical on HDPE because its low surface energy makes chemical adhesion alone insufficient.
Apply surface activator or molecular bonding primer:
- Use the specific activator included in your repair kit
- For TPRS, saturate the roughed surface with Poly Prep adhesion promoter
- Allow the recommended dwell time (typically 15-30 seconds for solvent-based activators)
- Ensure complete drying before proceeding
Step 3: Apply the Patch or Repair Wrap
Cut the patch material to cover the entire marked repair zone with overlap on all sides. For wrap-style systems, begin wrapping from one end of the repair boundary with consistent, overlapping tension.
For molecular bonding systems like TPRS:
Apply the PTFE-coated E-glass fabric patch after the molecular bonding activator has dried. The patented process crosslinks the patch directly to the HDPE surface at the molecular level — not through surface adhesion — creating bonds that can exceed the original pipe's pressure rating.
This was field-proven in the 2023 Borouge repair of a 78-inch HDPE pipe in Abu Dhabi, where patches held 1,800 psi at 20°C without adhesive failure.
Apply uniform pressure across the patch using a roller or hand pressure tool, working from center outward to eliminate air pockets and ensure complete contact.
Step 4: Cure and Allow Bond to Set
Follow the kit's specified cure time before returning the pipe to service. Temperature directly affects cure speed: higher ambient temperatures accelerate curing, while cold conditions extend it.
Protecting repairs in adverse conditions:
- Maintain minimum ambient temperature for curing (consult manufacturer specifications)
- Shield the repair area from rain, snow, or standing water during cure
- Consider using temporary enclosures or heat sources in cold environments
- Use heat guns or hair dryers to assist drying in humid conditions
Do not pressurize the pipe before the bond has fully cured. Partial curing is the most common cause of repair failure on first pressure test.
Step 5: Test and Return to Service
Start with a low-pressure test: bring the pipe to roughly 25-30% of operating pressure and hold while inspecting the repair visually. Apply soapy water to the repair area — any bubble formation signals a leak.
Once the low-pressure test passes, gradually bring the pipe to full operating pressure and monitor for at least one full operating cycle before considering the repair complete.
HDPE-specific testing considerations:
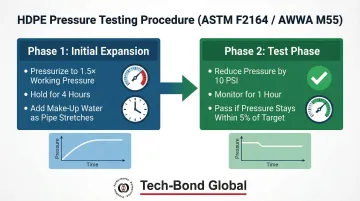
Because HDPE is a viscoelastic material that expands under pressure, follow ASTM F2164 and AWWA M55 testing procedures:
- Initial expansion phase: Pressurize to 1.5 times working pressure and maintain for 4 hours, adding make-up water as the pipe stretches
- Test phase: Reduce pressure by 10 psi and monitor for 1 hour—if pressure remains steady (within 5% of target), the repair passes
Document the repair location, date, kit used, and test results for maintenance records.
Fix vs. Replace: When Each Makes Sense
The cost of replacing HDPE pipe—especially large-diameter lines—in active industrial or municipal environments is substantial, but a failed repair under pressure creates safety and compliance risks. The decision should be based on damage type, pipe age, operating pressure, and repair history.
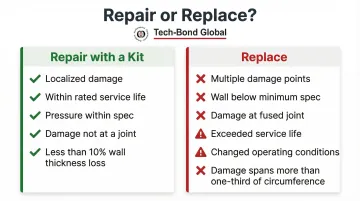
Repair with a Kit When:
- Damage is localized (single crack, puncture, or surface erosion)
- The pipe is within its rated service life (50-100 years for buried HDPE)
- Operating pressure is within specification
- Damage is not at a joint or fitting
- Damage is less than 10% of minimum wall thickness
Industry standards dictate that gouges or cuts exceeding 10% of the pipe's minimum wall thickness require replacement or structural repair. Mechanical band clamps are rated only as temporary fixes only.
Replace When:
- The pipe shows multiple damage points along the same run
- Wall thickness is below minimum spec from erosion or wear
- Damage is at a fused joint or electrofusion fitting
- The pipe has exceeded its design service life
- Operating conditions have changed beyond the pipe's original pressure and temperature rating
- Damage spans more than one-third of pipe circumference
- Pipe shows severe kinking or deformation
Not every situation is a clean fix-or-replace decision. Sometimes a damaged line needs to stay operational while replacement is sourced or scheduled.
Temporary vs. Permanent Solutions
When immediate replacement isn't possible, a temporary repair kit can buy time — but only if replacement is actively planned, not indefinitely deferred. Full-encirclement mechanical band clamps work for emergency containment, but they cannot hold against the dimensional shifts HDPE undergoes through heating and cooling cycles, which leads to joint separation and recurring leaks over time.
Common Mistakes to Avoid When Repairing HDPE Pipes
Skipping or Rushing Surface Prep
The most common failure mode is skipping surface activation. Without proper abrasion and cleaning, any patch will delaminate under pressure — HDPE simply cannot be bonded the same way as metal or PVC.
When the oxidized outer layer isn't fully removed before bonding, the adhesive grips only the weak, degraded surface. That's enough to fail under pressure, even if the patch looks solid initially.
Using the Wrong Repair Product
Epoxies, standard fiberglass wraps, and pipe repair clamps are not designed for HDPE's low surface energy and flexibility. Even products marketed as "universal" pipe repair kits often fail on HDPE—the kit must be specifically rated for polyolefin or HDPE substrates.
Generic products lack the chemical primers required to alter polyolefin surface energy, producing joints that fail under shear stress or thermal cycling.
Pressurizing Before Full Cure
Returning the pipe to service before full cure causes failure at the bond interface — even when the patch looks solid. Always follow the manufacturer's specified cure time. Temperature affects cure rates significantly, so factor in ambient conditions before scheduling return-to-service.
Ignoring the Root Cause
If the damage originated from water hammer, over-pressure, or installation error, patching alone will result in repeat failures nearby. A repair kit addresses the symptom. To prevent recurrence, also correct:
- Surge control and pressure management
- Anchoring for thermal expansion
- Installation practices that caused the original damage
Frequently Asked Questions
Can you repair an HDPE pipe?
Yes, HDPE pipes can be repaired in the field, but only with kits specifically engineered for HDPE's low surface energy. Standard adhesives and epoxies do not bond to HDPE and will fail under pressure due to the material's inherent resistance to bonding.
What is the best repair method for HDPE pipes?
Molecular bonding patch systems (such as those using PTFE-coated fabric with surface activators) outperform adhesive wraps or clamps. They bond at the substrate level rather than relying on surface adhesion, which HDPE resists, and can create permanent repairs that exceed the original pipe's pressure rating.
How long does an HDPE pipe repair last?
Longevity depends on the kit, surface preparation, and operating conditions. Molecular bonding repairs applied correctly can be permanent; adhesive-based repairs degrade under pressure and thermal cycling. Independent testing shows specialized systems holding 1,800 psi at 20°C for over 100 hours.
Can you use epoxy on HDPE pipes?
Standard epoxies do not adhere to HDPE due to its low surface energy (31.6 dynes/cm) and non-polar surface chemistry. Even with surface prep, epoxy bonds on HDPE tend to fail under pressure or flexing. HDPE-specific bonding systems are required for durable repairs.
What tools do you need to repair an HDPE pipe?
Essential tools include a solvent cleaner for polyolefins, 80-grit abrasive for surface prep, the repair kit (surface activator + patch material), a cutting tool for the patch, a roller or pressure applicator, and appropriate PPE. No heat, welding equipment, or heavy machinery is needed for kit-based repairs.
When should an HDPE pipe be replaced instead of repaired?
Replace rather than repair when any of the following apply:
- Damage occurs at fused joints or across multiple failure points on the same run
- Wall thickness falls below minimum spec or exceeds 10% loss
- The pipe has surpassed its design service life (50–100 years)
- Operating conditions exceed the pipe's original pressure or temperature rating