Introduction
PVC pipes account for roughly 66% of household plumbing material usage in the U.S. residential sector and represent 23–27% of all pipe installed in U.S. water systems. These thermoplastic pipes are the backbone of modern water supply, drainage, and irrigation systems—affordable and easy to install.
But even well-installed PVC pipes develop problems. UV exposure degrades impact resistance. Freeze-thaw cycles build internal pressure that cracks pipe walls or forces joints apart. Improper solvent welding—especially skipping primer—leaves joints vulnerable to leaks. And physical damage from shifting soil, dropped tools, or improper supports can cause sudden failures.
The consequences of ignoring a small leak add up fast:
- The average homeowners' water damage and freezing claim reached $20,062 in 2023, per the Insurance Information Institute
- Mold spores can begin germinating within 24 to 48 hours of moisture entering a home
- Household leaks waste more than 10,000 gallons of water per year, driving up utility bills and risking structural damage
This guide walks through why PVC pipes fail, how to catch problems early, and five repair methods—from quick temporary fixes to permanent solutions—so you can choose the right approach before a small drip becomes a costly repair.
Key Takeaways
- PVC pipes crack or leak at joints due to age, freeze-thaw stress, poor installation, or physical impact
- Warning signs include dripping sounds, musty odors, wall stains, or pooling water near pipes
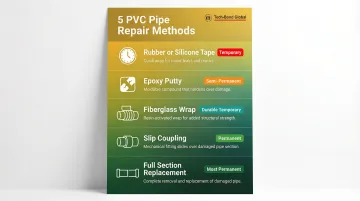
- Five repair methods are available — from rubber tape as a fast temporary patch to full section replacement for a permanent fix
- Match your repair method to the damage size, pipe accessibility, and how long the fix needs to last
- Call a professional when leaks are inside walls, underground, or after DIY attempts don't hold
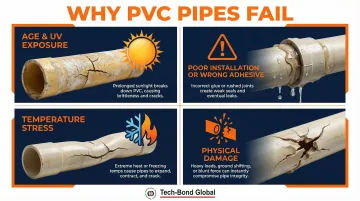
Common Reasons PVC Pipes Fail
PVC is durable—properly installed systems can last over 100 years—but it's not indestructible. Most failures trace back to four predictable root causes.
- Age and UV exposure — PVC walls weaken and become brittle over time, especially in pipes over 20 years old. Sunlight degrades the outer surface, reducing impact resistance until constant water pressure eventually causes cracks.
- Poor installation or wrong adhesive — Skipping PVC primer, applying cement after the primer dries, or using the wrong solvent cement prevents proper bonding. Loose joints and misaligned fittings create weak points that fail under normal operating pressure.
- Temperature stress — When water freezes inside a pipe, it expands with enough force to crack the wall or separate joints. Heat cycles cause expansion and contraction that stress fittings over time, particularly in uninsulated outdoor or attic installations.
- Physical damage — PVC cracks from impact: tools dropped under a sink, shifting soil around buried lines, or incorrectly placed pipe supports. Once UV-weathered or aged, impact resistance drops significantly.
Left unaddressed, even a small leak escalates into mold growth, rising water bills, and structural damage to walls, ceilings, and foundations.
How to Tell If Your PVC Pipe Is Leaking
Most PVC leaks show up before they become serious damage — if you know what to look for. Common warning signs include:
- Dripping or trickling sounds inside walls after using a fixture
- Pooling water or moisture near pipe runs
- Discoloration or staining on walls, ceilings, or floors
- Visible mold growth near pipe locations
- Musty smells in enclosed spaces
If you don't see anything obvious, a water meter test can confirm what's happening behind the walls.
Confirm a Hidden Leak with a Water Meter Test
Turn off all water outlets inside and outside the house. Check your water meter's leak indicator dial — if it's spinning, there's a leak. If there's no indicator, note the position of the sweep hand, wait several hours without using any water, and check if the hand has moved.
Pressure Drop Test
For water supply systems, the International Plumbing Code requires a pressure test held at no less than the system's working pressure for at least 15 minutes. For drainage and vent systems, fill the system with water to a minimum 10-foot head and hold for 15 minutes.
Condensation vs. Structural Leak
Not every wet pipe is a leaking pipe. Condensation forms when warm, humid air hits a cold surface — it appears as widespread, uniform dampness with no clear origin point. A structural leak looks different: localized drips, water trails, or mineral ring stains that point to a specific source.
Moisture meters and infrared cameras can help pinpoint the source, though metal pipes nearby may trigger inaccurate readings.
How to Repair PVC Pipe: 5 Methods (Step-by-Step)
The right repair method depends on the size of the damage, whether the pipe is accessible, and whether you need a temporary fix or a permanent solution. Here are five methods in order of complexity.
Before You Start
Essential Tools and Materials:
- Pipe cutter or hacksaw
- Medium-grit sandpaper
- Clean rags
- PVC primer and cement (for permanent repairs)
- Measuring tape
- Specific repair material for your chosen method
Two Non-Negotiable Prep Steps:
- Shut off the water supply before starting
- Dry the damaged area as thoroughly as possible—most repair materials bond poorly to wet surfaces
Method 1: Rubber or Silicone Repair Tape (Quickest Temporary Fix)
Self-fusing, stretchy rubber or silicone tape wraps directly over the leak to create a compression seal. Best for minor leaks on the pipe body (not joints). No drying time needed for application, though full cure takes up to 24 hours.
Typical performance specs for self-fusing silicone tape:
- Tensile strength: 700–950 PSI
- Elongation: 300%–800%
- Operating temperature: -60°C to 200°C
- Can be applied to wet, dirty, or oily surfaces
Steps:
- Clean and lightly sand the damaged area
- Stretch the tape (up to 3 times its length) and wrap tightly around the leak
- Overlap each pass by 50% to 2/3, extending 1–2 inches past each edge of the damage
- Press firmly with each pass to create layers
- Allow to cure per manufacturer instructions before restoring water flow
Keep in mind: Manufacturers explicitly state this tape is "not designed to be a permanent repair." It handles pipe body leaks only — not joints.
Method 2: Epoxy Putty (Quick Semi-Permanent Patch)
Two-part epoxy is kneaded together until it forms a uniform putty, then molded over the crack or hole to create a waterproof seal. Cures in 20–25 minutes. More durable than tape, but not a substitute for a permanent fix on high-pressure lines.
Two common products compared:
| Product | Cure Time | Strength | Max Pressure |
|---|---|---|---|
| J-B Weld WaterWeld | 1 hour (sets in 15–25 min) | 4,370 PSI | 500 PSI |
| Loctite Repair Putty | 24 hours (handles in 15 min) | 1,703 PSI shear | Not rated for pressure pipe |
Steps:
- Drain and thoroughly dry the pipe
- Lightly sand and clean the damaged area
- Mix the two epoxy parts per manufacturer instructions until evenly colored
- Mold the putty firmly over the damaged area, ensuring no gaps remain
- Wait the full cure time (usually 20–25 minutes) before gradually restoring water flow
Keep in mind: Consumer epoxy putties are "not to be used for pressure pipe repair or structural applications." Skip this method for large or deep holes.
Method 3: Fiberglass Resin Tape or Repair Wrap (Durable Temporary Repair)
Water-activated polyurethane-impregnated fiberglass wraps cure in 15 to 90 minutes and harden around the pipe to create a rigid, pressure-resistant shell. With proper application, they outlast rubber tape significantly and can hold for a year or more.
Standard fiberglass tape covers most residential and light commercial jobs. For more demanding applications, PTFE-coated E-glass fabric wraps — such as those in Tech-Bond Global's Tech Wraps system — provide superior mechanical, chemical, and temperature resistance.
Tech-Bond's Tech Patch Repair System (TPRS) uses molecular-level polymer bonding to create permanent bonds on HDPE, steel, copper, and PVC substrates — the only repair system of its kind proven on large-diameter HDPE pipe.
Performance benchmarks for fiberglass wraps:
- Pow-R Wrap: up to 425°F, holds 100 PSI
- FiberWeld 2" Pipe Repair Cast: rated to 500 PSI
- ASME PCC-2 and ISO 24817 govern qualification, design, and testing of composite repair systems
Steps:
- Clean and lightly sand the damaged section
- Wet the fiberglass tape per instructions (typically 10 seconds)
- Wrap tightly around the pipe, overlapping each layer slightly
- Extend 1–2 inches beyond the damage on each side
- Smooth out air bubbles
- Allow 15–30 minutes to cure before using the pipe
Methods 1–3 buy time. Methods 4 and 5 fix the problem for good.
Method 4: PVC Slip Coupling (Permanent Fix for Accessible Pipes)
A slip coupling is slid over the cut ends of a damaged pipe section and glued in place using PVC primer and cement. Considered a permanent, pressure-rated repair. Best when the leak is accessible and you can cut into the pipe line.
Note on pressure ratings: PVC Schedule 40 and 80 fittings must be derated above 73°F. A 1-inch Schedule 40 fitting rated at 270 PSI at 73°F drops to 59 PSI at 140°F — relevant if the pipe carries hot water.
Steps:
- Drain the pipe fully
- Cut through the pipe directly at the leak location using a hacksaw or pipe cutter
- Lightly sand both cut ends and the inside of the coupling
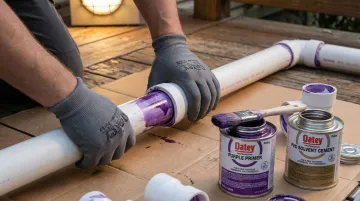
- Apply PVC primer to pipe ends and coupling interior—primer is mandatory to penetrate and soften the pipe and fitting surfaces
- Apply solvent cement immediately while the primer is still wet
- Slide the coupling onto one pipe end, press and twist to seat, hold for 15 seconds
- Repeat for the other end
- Allow the cement to cure before restoring water flow
Cure times vary by temperature:
- 60°–100°F: 15 minutes (Oatey) or 1 hour (Spears) before testing up to 180 PSI
- 20°–40°F: 36–48 hours for pressures over 180 PSI
Critical Safety Warning: Do NOT use compressed air or gases to test any PVC piping system. Compressed air stores energy that can cause explosive fragmentation, leading to severe injury or death. Hydrostatic (water) testing is the only approved method.
Method 5: Full Pipe Section Replacement (Most Permanent Solution)
The entire damaged section is cut out and replaced with a new length of PVC pipe connected using two couplings. The most reliable long-term fix, especially when damage spans several inches or the pipe is heavily degraded.
Steps:
- Shut off water and drain the pipe
- Mark and cut out the damaged section plus about 1 inch on each side using a hacksaw
- Sand all cut ends smooth
- Measure the removed section and cut a new piece of the same diameter (slightly shorter to allow for coupling depth)
- Dry-fit first to confirm alignment
- Apply PVC primer and cement to all pipe ends and coupling interiors
- Connect both couplings sequentially, pressing and twisting each joint
- Hold each joint for 15 seconds
- Allow full cure time before pressurizing
Properly solvent-welded PVC joints carry a documented service life exceeding 100 years under normal operating conditions — making this the only method worth using when long-term reliability matters.
Temporary vs. Permanent: Choosing the Right PVC Repair
Temporary repairs are faster and cheaper but will need revisiting. Permanent repairs take more time and skill but eliminate future risk. The right choice depends on damage size, pipe accessibility, urgency, and whether the pipe is under pressure.
Use the table below to match your situation to the right approach.
| Damage Scenario | Repair Method | Key Notes |
|---|---|---|
| Small crack or pinhole, low-pressure line, fast fix needed | Rubber tape or epoxy putty | Emergency use only — plan a permanent fix within weeks |
| Small to moderate crack, accessible pressurized pipe | Slip coupling | Don't rely on tape or epoxy long-term on pressurized lines |
| Damage spans several inches, heavy degradation, or multiple failures | Full pipe section replacement | Patching an overstressed section rarely holds — replace it |
| Leak at a joint (not the pipe body) | Re-glue or replace the fitting | Epoxy putty can buy time; tape won't seal joint leaks effectively |
When to Call a Professional:
- Damaged pipe is in a wall, ceiling, or underground
- Main water line or sewer pipe is involved
- You've attempted a repair and the leak recurs
- Local building codes require licensed plumbing work
Common Mistakes to Avoid and Prevention Tips
Costly Repair Mistakes:
- Apply tape or epoxy only to clean, dry, lightly roughened surfaces — wet or dirty surfaces are the leading cause of failed repairs
- Match cement type to your pipe spec and follow manufacturer instructions; over-application creates messy joints without improving bond strength
- Never skip PVC primer — it softens the surface for bonding, and inadequate penetration is the most common cause of solvent-welded joint failures
- Cut out solvent-welded fittings rather than attempting to remove and reuse them; once bonded, they cannot be cleanly separated
- Respect full cure times before pressurizing; even a joint that feels solid can fail under pressure if rushed
Avoiding these mistakes during repairs is only half the equation. Routine maintenance keeps PVC systems from reaching that point in the first place.
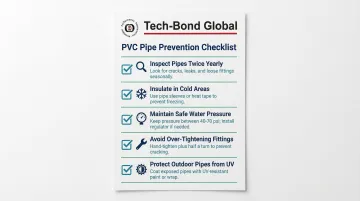
Prevention Practices to Extend Pipe Life:
- Inspect visible PVC pipes twice a year for discoloration, soft spots, or hairline cracks, especially near joints
- Insulate pipes in unheated spaces or areas exposed to freezing temperatures—the IPC requires protection from freezing for pipes installed outside, in attics, crawl spaces, or outside walls
- Maintain water pressure within recommended limits to avoid stressing joints
- Avoid over-tightening threaded fittings during installation
- Protect outdoor pipes from UV exposure by painting or wrapping them
Catch problems early, prep surfaces correctly, and match the repair method to the scale of the damage — those three habits will handle the vast majority of PVC issues before they become costly replacements.
Frequently Asked Questions
Can PVC pipe be repaired?
Yes, most PVC pipe damage—including cracks, small holes, and minor joint leaks—can be repaired using methods like epoxy putty, repair tape, fiberglass wrap, or slip couplings. The right method depends on the severity of the damage and whether a temporary or permanent fix is needed.
What is the best way to permanently repair a PVC pipe?
For a permanent fix, a PVC slip coupling or full pipe section replacement using PVC primer and solvent cement is the most reliable approach. Both create a pressure-rated, watertight bond built to last — tape and epoxy are better suited for temporary fixes.
Can you fix a PVC pipe leak without cutting the pipe?
Rubber repair tape or epoxy putty can often seal minor leaks on the pipe body without cutting. However, joint leaks or larger cracks typically require cutting the pipe to insert a coupling or replace the section for a lasting repair.
How do you patch a hole in PVC pipe?
Small holes can be sealed with two-part epoxy putty: clean and dry the area, mix the epoxy, and mold it over the hole. For larger holes or high-pressure lines, cutting out the damaged section and installing a new pipe segment with couplings is the more reliable solution.
How long does a PVC pipe repair last?
Lifespan varies by method: rubber tape and epoxy are temporary (weeks to months), fiberglass wraps can last months to years, and slip coupling or full section replacement with solvent cement are permanent repairs that match the original pipe's lifespan.
When should I call a plumber to fix a PVC pipe?
Call a professional if:
- The leak is inside a wall, ceiling, or underground
- It involves a main water supply or sewer line
- DIY repairs have failed to stop the leak
- Local building codes require licensed plumbing work