Why Plastic Gas tanks crack.
Plastic gas tanks (typically made from HDPE or other fuel-resistant thermoplastics) crack primarily due to a combination of stress, environmental exposure, and material fatigue over time. These tanks expand and contract repeatedly with temperature swings and fuel vapor pressure, creating cyclical stress in the polymer. Vibration from vehicle operation or equipment movement adds additional mechanical fatigue.
Over time, hydrocarbons can slowly permeate the plastic, slightly altering its properties, while UV exposure (if not fully UV protected) can embrittle the outer surface. Stress concentrations around fittings, seams, mounting brackets, and molded corners become initiation points for micro-cracks. As those micro-cracks grow under continued vibration and thermal cycling, they eventually propagate into visible fractures or leaks. In short, cracking is rarely caused by one event—it is the cumulative effect of mechanical stress, chemical exposure, and thermal cycling acting on a polymer structure that was never designed to be permanently reinforced.
Can You Repair a Plastic Gas Tank?
Yes — most plastic gas tanks can be permanently repaired, provided the crack or hole is properly prepared and sealed with a system designed for low surface energy plastics like polyethylene. Many gas tanks are made from HDPE, which traditional epoxies and sealants struggle to bond to. Temporary fixes may stop a leak briefly, but they often fail due to vibration, fuel exposure, and temperature changes. Yes — most plastic gas tanks can be permanently repaired, provided the crack or hole is properly prepared and sealed with a system designed for low surface energy plastics like polyethylene. Many gas tanks are made from HDPE, which traditional epoxies and sealants struggle to bond to.
Temporary fixes may stop a leak briefly, but they often fail due to vibration, fuel exposure, and temperature changes. A successful repair requires proper surface preparation and a bonding system that integrates with the plastic itself, creating a fuel-resistant, vibration-tolerant seal that restores structural integrity without replacing the tank.
The key difference is this: metal repairs rely primarily on mechanical adhesion, while plastic tank repairs require a system capable of creating a stable, fuel-resistant bond to the polymer itself. When done correctly, a plastic gas tank can be permanently repaired without replacement — restoring structural integrity and eliminating leaks for the life of the tank.
Step-by-Step Repair Method for Plastic Gas Tanks
Surface conditioning
- Surface prep is what you do with a metal gas tank and is usually accomplished by sand blasting. Surface preparation for a metal gas tank is typically accomplished by sandblasting or aggressive abrasion to remove rust, paint, and contamination, creating a rough surface that allows coatings or sealants to mechanically grip the metal. Metal has relatively high surface energy, so once it is clean and properly profiled, many repair materials can adhere effectively.
- Plastic gas tanks are different. Most are made from HDPE, a low surface energy thermoplastic that resists bonding. Simply sanding the surface is not enough. While abrasion is still necessary to remove oxidation and expose fresh material. Tech-Bond call this abrasion, “roughing to below the sheen” which means that you need to rough, or sand to below the shininess. Once you get below the sheen, you have reached the the core plastic. In other words, you’re down to the core plastic.
- Successful bonding or repair of a polymers also requires a bonding system specifically designed to interact with low-energy polymers. Without proper surface conditioning, traditional glues, epoxies and sealants may appear to hold at first but will eventually fail due to vibration, fuel exposure, and/or thermal cycling.
- The next step in Surface Conditioning is to use Tech-Bond’s Poly Prep, an adhesion promoter, an etch. To properly condition the surface with the Poly Prep, you need to saturate the surface area to be repaired with the Poly Prep. You need to make the surface look “wet”. There is a lot etching that needs done. Let the Poly Prep dry. If you’re in an humid environment, use a heat gun or hair dryer to dry the suface. By elimination the ambient moisture, you may have more work time.
- Then spray the prepared surface with the catalyst, the Activator/Accelerator (AA). It is critical to let the AA dry. You get a much stronger chemical reaction when the AA is allowed to dry. Again, if necessary, use a heat gun or hair dryer to dry the surface where the AA was applied.
Applying the Bonding Agent
Tech-Patch Video
Why Plastic Gas Tanks are so difficult to repair
Plastic gas tanks — especially those made from HDPE (high-density polyethylene) — are challenging to bond for several reasons:
Low Surface Energy
HDPE has very low surface energy, which means adhesives cannot properly “wet out” and spread across the surface. Instead of flowing and gripping, most adhesives bead up and sit on top of the plastic. Most Epoxies are not made for HDPE tanks and the manufacturers, most of them, recommend that their product “NOT’ be used on HDPE tanks.
Chemical Resistance
Gas tanks are designed to resist fuels, solvents, and chemicals. Unfortunately, the same chemical resistance that protects the tank also prevents many adhesives and sealants from forming a strong bond. Surface conditioning is vital with HDPE tanks.
Fuel Exposure
Gasoline, diesel, especially the high octane, or high cetane versions, ethanol blends, and vapors can attack or soften traditional repair materials over time. Many (most) adhesives degrade when exposed to constant fuel contact. Tech-Bond’s patches are made for PTFE coated e-glass faric. PTFE (Teflon) is the polymer that has the greated resistance to fuels, all grades and varieties.
Thermal Expansion and Contraction
Plastic tanks expand and contract significantly with temperature changes. A rigid repair material, or, in many cases, welding, cannot move with the tank, causing cracks, separation, or delamination.
Vibration and Flexing
Vehicles, equipment, and machinery create constant vibration. Plastic tanks flex under load. Rigid or brittle repair systems fail under repeated movement. Tech-Bond’s patches are molecularly (cross-linked) with the HDPE for other polymer so failure is unlikely.
Surface Oxidation
Over time, HDPE develops a thin oxidized layer that is weak and unstable. If this layer is not removed during surface preparation, the repair bonds to the oxidation instead of the solid substrate. Removal of this oxidized layer is part of surface conditioning.
Mold Release Contamination
Many plastic tanks are manufactured using rotational molding, which can leave behind mold-release agents or surface contamination that interfere with adhesion. Again the surface roughing (conditioning) will remove this oxidation.
Smooth, Non-Porous Surface
Unlike metal, plastic does not have natural porosity or surface profile for mechanical grip. Even when sanded, bonding remains chemically difficult. Our Poly Prep, a component of our surface conditioning, etches the poly surface.
Stress-Crack Propagation
Cracks in plastic tanks can continue to grow due to internal stress. If the repair does not reinforce and stabilize the surrounding area, the crack may reappear adjacent to the patch. Two things, 1) drilling the small hole at the end of each cracks stabilizes the surface and the patch reinforces the plastic.
Step-by-step Guide
- Apply the patch to the damaged area, The patch should extend one inch beyone the damaged area on all sides.
- If the damage is a crack, a small hole should be drilled at each end of the crack. Propagation of the crack can occur if these holes are not drilled. If the cracks extend, a new patch may need to be applied.
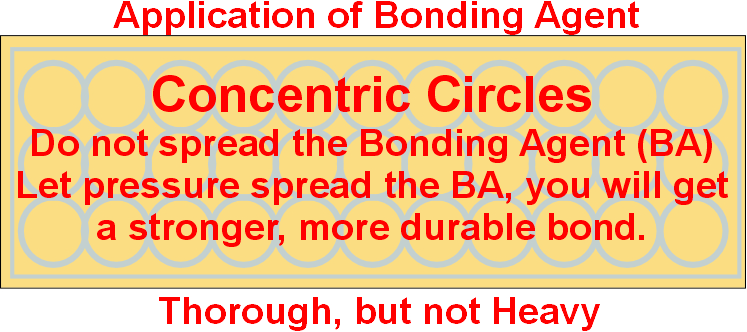
- With molecular integration, applying too much Bonding Agent is a fail point. Molecular integration or cross-linking requires contact between the surfaces. Layers of adhesive interferes with the level of direct contact needed for bonding. Therefore, in applying the Bonding Agent, you apply in small, concentric circles as shown above thorough, but not heavyl The final step is to run a bead of Bonding Agent all the way around the perimeter. Having the Bonding Agent reach the edge where the surfaces meet is important in most cases. Note: You can also apply the Bonding Agent onto the surface using a checkerboard pattern.
- Grab diagonal edges of the patch and press tbe patcb over the damaged area. Press down the edges of the patch
- Holding the glue squeegee at an angle, apply pressure on the patch from the center out. Your objective is to squeeze every excess drop of Bonding Agent from between the tank and the patch. Excess adhesive is a fail point. What makes the patches successful is the molecular integration that occurs between the plastic of the tank and the HDPE coating of a patch. If there is excess adhesive, molecular integration will not/can not occur.
- Run beads of the Bonding Agent on top of the patch, about a third of an inch apart. Then run a bead of Bonding Agent along the seam all the way around the patch. Spread the Bonding Agent as thinly as possible with the glue squeegee.
- Repeat # 4 twice.
- Spray a very light mist of the catalyst, the AA on the Bonding Agent.
- Visually inspect the patch. Correct any problems, usually with the Bonding Agent and catalyst.
Poly Shield – Molecularly Integrated protection for the exterior
A poly shield has been created on the patch. In addition, the Bonding Agent has taken on the characteristics of the PTFE coated e-glass fabric improving the mechanical, chemical and physical characteristics of the Bonding Agent. Fro example the operational temperature range has been increased by twenty-five percent or more. Finally, operational strength is reached within seconds. Full strength is reached after twenty-four hours.
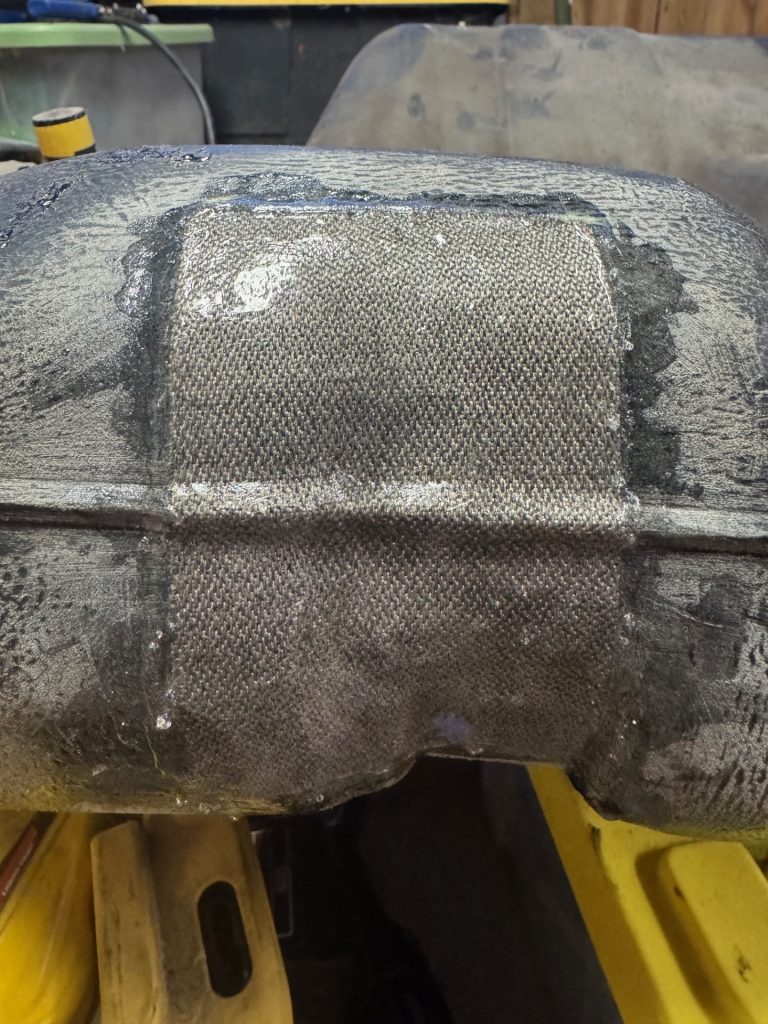
Repairing a split seam seam on a plastic gas tank.
Cameron had a split seam and some additional damage on his plastic gas tank. Picture below.
- Drill a small hole at each end of the seam.
- Rough the surface to “below the sheen”. An area one inch beyond the damaged area on all sides must be roughed to one inch beyond the damage on all sides. All residue must be removed.
- Spray the roughed area with the Poly Prep to the point of saturation. The surface must look wet. Let dry. A heat gun or hair dryer can be used to aid the drying process.
- Spray the Poly Prep on the split seam. Saturage the surface so that it looks wet. Let dry. You can use a heat gun or hair dryer to dry the surface.
- Spary the catalyst, the Activator/Accelerator on the same area. Let the catalyst dry.
The Patch on a Patch Technique
The core material for our patches and wraps is PTFE coated e-glass fabric. PTFE (Teflon) is the most fuel resistant polymer made. That’s why we decided to use PTFE coated e-glass fabric as our patch material. By itself, PTFE is not flexible so we had to use woven PTFE which means that we have to seal the weave. We do that with our Si Black Bonding Agent.
To seal the tank, the PTFE coated e-glass fabric has to lie flat against the tank. There can be no folds, or bends. Anything but a flat surface us problematic. With seams, getting that flat layer can be difficult. What we flound is that a double patch or a patch on a patch is needed. The first patch is applied over the patch with the same techniques as describe above. The one difference is that you only go on-half inch beyond the end of the crack or of damage. Again you use the glue squeegee to apply pressure on the patch from the center out. You do want to remove every excess drop of adhesive from between the patch and the tank.
Once the first layer of patch lies flat over the seam.on the tank, Warm the surface of the first patch to about 120°F, which, by touch is very warm. When it gets to about the 120°F, the patch will get hot. The chemical reaction has started. STOP heating the patch. The termperature will be maintained for 3 – 5 minutes. More cross-links are forming during this period. The greater the number of cross-links, the more durable the bond.
You can tell how well the first patch over the split seam went on. How flat that patch was. That is what will guarantee success.
Cameron’s comments
“I put the 2×1 patch over the seam and then cut the 3×9 in half bc I really only needed a 3×4.5 to cover everything by an inch.
It came out pretty good, not perfect tho. I probably should have trimmed the width down some and then angled the patch to match the direction of the crack instead of trying to do one large patch to square it up. The glue was wanting to dry as soon as the patch touched the tank so a small section on the big patch didn’t want to lay down to the left of the small patch. Once I put the glue over the top a couple times tho it seems to be solid.
It helped a lot by pressing the big patch over the seam first and then laying down the top and bottom to lay flat. I feel like it should keep it from leaking. I think most of the leaking was coming from the seam and the first patch covered that pretty good and then the top of the big patch layed down good and that was the only spot left with a crack so I’m pretty optimistic about it.”
Applying the Second Layer of Patch
Cut a second patch to fit. This second patch must extend 1 inch beyond the cracked seam and the other damaged area if there is any. To apply this second patch, spray the catalyst on the first patch … and a littly beyond. Let the catalyst dry.
Apply the Bonding Agent to the second patch using the same concentric circle. A checkerboard pattern can also be used. The Bonding Agent application must be thourough, but not heavy. Grab the Patch by the corners, apply over the first patch. Press down the edges
Use the glue squeegee, at an angle, to apply pressure from the center outward. Again, the objective is to remove every excess drop of Bonding Agent from between the patch and the tank. Too much adhesive is a fail point. The patch or wrap must be bonded to the tank.
Final Steps
- Run beads of the Bonding Agent on top of the patch, about a third of an inch apart. Then run a bead of Bonding Agent along the seam all the way around the patch. Spread the Bonding Agent as thinly as possible with the glue squeegee.
- Repeat # 1 twice.
- Spray a very light mist of the catalyst, the AA on the Bonding Agent.
- Warm the surface to about 120°F. When the surface gets hot. STOP warning.
- Visually inspect the patch. Correct any problems, usually with the Bonding Agent and catalyst.
When the result looks this good, the patch almost always works.
Safety Concerns
- Area should be well ventilated.
- If not well ventilated, a fan should be used
- If a fan is not available, use a respirator
- When applying the Bonding Agent to large areas, gloves should be worn.