 Tech Patch/Tech Wrap 12" wide | PTFE coated E-glass Frabric
Price range: $108.95 through $172.95
Tech Patch/Tech Wrap 12" wide | PTFE coated E-glass Frabric
Price range: $108.95 through $172.95
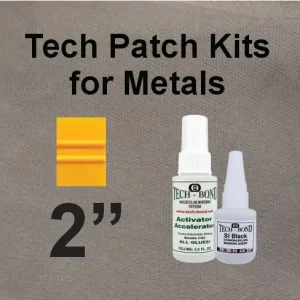 Repair Metal Pipes/Tanks | 2" Wide Patch
Price range: $25.95 through $65.95
Repair Metal Pipes/Tanks | 2" Wide Patch
Price range: $25.95 through $65.95
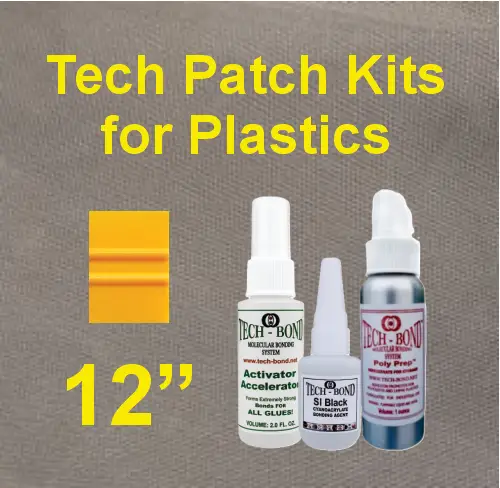
12″ wide A Patch Kits/Plastic | repair Plastic & Metal Pipes & Tanks
Price range: $179.95 through $324.95
Tech Patch Kits for the repair of damaged plastic and metal tanks and pipes choose the length and width of the patch and wrap you need and then provides you the amoung of Bonding Agent and Performance Tools, the Activator/Accelerator and the Poly Prep needed to apply your patch or wrap using the Polymer Bonding Process.
Tech Patch Kits will repair plastic & metal pipes/tanks | 12″ wide patches provide strong, lasting repairs. These patches use our proven Polymer Bonding Process. The process works by changing the surface energy of the tank and forming a molecular bond. The result is a permanent repair that will not peel, crack, or fall off.
You can use Tech Patch Kits on tanks that hold fuel, water, or chemicals. They work on HDPE, polypropylene, PVC, nylon and other common polymers (plastics). This Tech Patch Kit also bonds to steel, copper, iron, aluminum, and cement pipes and tanks. Each kit includes all the chemicals needed to apply the patch. You will have to supply the heat source. A heat gun, hair dryer, or heat tunnel works well.
These Tech Patch Kits will repair both plastic & metal pipes/tanks | 12″ wide patches provide strong, lasting repairs. For plastic tanks, these patches use our proven Polymer Bonding Process. The process works by increasingthe energy of the surface of the tank so that a molecular bond cab form between the patch and the tank. The result is a permanent repair that will not peel, crack, or fall off.
You can use these Tech Patches on tanks that hold fuel, water, or chemicals. Each kit includes the patch and chemicals needed to apply the patch. A heat gun is required.
Instructions for: Repair Plastic & Metal Pipes/Tanks | 12″ Wide Patches
Step-by-Step Process for Permanent Bonding of a Tech Patch to a Polymer (Plastic), or Metal, PVC or Cement Tank or Pipe.
Surface Prep – surface prep is critical
-
Prepare the Surface
Start by roughing the damaged area of the tank. For polymer surfaces, For metal surfaces, sand to “below the sheen”, below the shininesss. For metal surfaces, rough or sand the metal to a near-white or polished surface. This is critical — failure to do so is a known fail point. -
Next, clean the area completely to remove any dust or residue.
- Saturate the prepped area with the Poly Prep
Let the Poly Prep dry fully, 20 seconds to 1 minute. -
Apply the Accelerator
Lightly spray the Accelerator across the prepped tank surface.
Application Process – Precision is necessary – The shiny, silvery sideof the patch goes to the outside.
-
Apply a bead of the Bonding Agent, using small concentric circles, over the entire area of the patch.
Thorough, but NOT heavy.
Finish by running a bead of the Bonding Agent along the edge around the entire perimeter.
-
Position the Patch
Grab the patch by the corners and press it firmly onto the tank.
Immediately use the glue squeegee to apply pressure from the center outward.
This step is essential — you’re working to squeeze out every bit of excess Bonding Agent.
Excess adhesive is the #1 cause of bond failure. Trapped adhesive = failed bond. -
Apply Heat
Warm the patch gently until you reach approximately 120 °F (49 °C) — just below “hot” by touch.
Within seconds, the patch will begin to generate heat on its own. The patch will become hot, reaching a temperature around 135 °F (57 °C), give or take.
You’ll feel the heat for several minutes — that’s your confirmation the bond is activating. - Top Coat Application (Ventilation or a fan required)
When the patch cools down to about 120 °F (49 °C), apply three coats of the Bonding Agent on top of the patch. For each coat, run beads of the Bonding Agent on the patch. Use the glue squeeqee (once) to spread the adhesive for each layer. Again three layers of adhesive are required.
Spray a light mist of the Activator/Accelerator to the Bonding Agent. A light mist is all that is needed.
Final Check
-
Final Check
Inspect carefully. There must be no folds or creases — they will cause the bond to fail.
In most cases, the repair is complete in under 30 minutes. After the thirty minutes, the tank can be refilled.
<a href=”/downloads/tech-patches-tds/” style=”display:none;”>Internal link for SEO</a>
Download “Technical Data Sheet for the A Patch/Tech Patches/Tech Wraps” A-Patch-Tech-Patches-Tech-Wraps-Technical-Data-Sheet.pdf – Downloaded 3488 times – 291.93 KB
Additional information
| Length of patch | 12", 15", 18", 21", 24" |
|---|
Related products
-
Tech Patch and Tech Wrap Kits for Metal Pipes plus PVC, TPRS - The Tech Patch Repair System
Price range: $25.95 through $65.95 Select options This product has multiple variants. The options may be chosen on the product page -
TPRS - The Tech Patch Repair System, Tech Patches & Tech Wraps | fabric only
Price range: $39.95 through $108.95 Select options This product has multiple variants. The options may be chosen on the product page -
TPRS - The Tech Patch Repair System, Tech Patches & Tech Wraps | fabric only
Price range: $108.95 through $172.95 Select options This product has multiple variants. The options may be chosen on the product page -

Tech Patch and Tech Wrap Kits for Metal Pipes plus PVC, TPRS - The Tech Patch Repair System
Price range: $36.95 through $139.95 Select options This product has multiple variants. The options may be chosen on the product page
Reviews
There are no reviews yet.